Using MIDI in Visibox
You can run a whole show from the mouse and the computer keyboard. Visibox comes alive when you plug in a MIDI controller instead. Your hands stay on the pads, and a controller with lights tells you what is happening without you looking at a screen.
What MIDI can drive
Anything on the MIDI Map, which covers most of what you do during a show:
- Trigger a Clip by its position in the Song.
- Play, Stop, Pause and Resume.
- Move between Songs and between Clips, with or without stopping playback.
- Ride the master output volume from a fader.
- Sweep a Real-Time Control, which in turn moves a Clip or Effect parameter.
- Jump straight to a Song, either by scrubbing the Song list with one knob or by program change.
The assignments themselves live in Settings > MIDI, which is also where you arm a row and press the pad you want it to answer to. Changes to the map can be taken back while that tab is showing: press ⌘Z or use Edit > Undo, and the Edit menu reads Undo Edit MIDI Map. The steps last only while the Settings window is open.
Attaching and configuring MIDI devices
Most modern MIDI devices connect over USB. Plug the device into your computer, directly or through a hub, and Visibox picks it up. If your device only has DIN sockets, an inexpensive MIDI-to-USB interface bridges it.
Visibox listens for MIDI notes and continuous controller (CC) messages. That covers nearly every keyboard, pad grid and drum machine on the market. A few MIDI foot controllers send only program change. Visibox can use that to select Songs, but not to trigger Clips, so check for note or CC output before you buy one for this job.
New devices are enabled as inputs automatically. To stop Visibox listening to one, pick it under Input in Settings > MIDI and uncheck Enabled. That is worth doing when a keyboard is also feeding a DAW and you do not want its notes firing Clips.
Velocity sensitivity
A video Clip with audio can take its level from how hard you hit the pad. The control is Velocity Sensitivity, in the Clip’s audio options next to Volume.
Volume stays the Clip’s mix level. Velocity decides how far a hit moves it. At full sensitivity the response is the squared curve hardware samplers use; lower settings blend toward a fixed level, the way a synth’s velocity-amount knob does. It is off on every Clip until you turn it on, so nothing about an existing show changes.
Triggers that carry no velocity of their own count as a full-strength hit: the mouse, the computer keyboard, a Stream Deck, the API, OSC, the command line and Song Timelines.
One limit worth knowing: if the Clip’s Retrigger Action is Stutter, Reverse, Scratch, or Do Nothing, velocity applies to the first hit only. Visibox captions the slider “First hit only” when that is the case, so it does not read as broken.
MIDI Feedback
Controllers with lit pads can show you the state of the Song without you looking up. Visibox sends the mapped notes back out to the controller, so the pad you press to fire Clip 3 is the pad that lights up for Clip 3.

To turn it on, open Settings > MIDI, choose your device in the Input list, and set LED Feedback to Enabled. Visibox sends to the output port belonging to that same device, so there is nothing else to route.
The lights mean:
- Solid: the Clip is loaded in the current Song and ready.
- Fast blink: the Clip is playing.
- Slow blink: the Clip is paused.
- Off: that pad has no Clip in this Song, or no mapping at all.
Change Songs and Visibox runs a short flourish across the pads, lighting each available Clip in turn. It confirms that the new Song loaded, and shows which pads are live in it.
Feedback pays off most on grid controllers with per-pad lights, such as a Novation Launchpad or an Akai APC.
Selecting Songs via MIDI Program Change
If your controller or your backing-track software sends program change messages, those can select Songs. Open Settings > MIDI, pick the device that will be sending them, and scroll to the Select Song via Program Change row at the bottom of the table. The dropdown has three values.
- Disabled: program change messages are ignored.
- Song Order: the message selects by position. Program Change 0 selects the first Song, 1 the second, and so on. Reorder the Songs and the numbers follow the new order.
- Program Identifier: the message selects the Song holding that Program ID. Reorder the Songs and each one keeps its own number.
Program Identifier is the one to use for a set you rearrange. Assign a Song’s ID from its editor panel: right-click the Song in the Controller and pick a number under Program Identifier. Songs already holding an ID are listed beside their number, anywhere in the Project: one that is not in the active Setlist reads “(not in setlist)”. Choosing a number that is taken swaps the two Songs’ IDs rather than creating a duplicate. New Songs get the next free ID on their own unless you turn off Auto-Assign Program ID to New Songs in Settings > General.
Program change messages run 0 to 127 on the wire, but plenty of hardware and software displays them as 1 to 128, which is how Visibox numbers Program Identifiers. If your device counts from 0 instead, turn on Program Change numbers start at 0 in Settings > MIDI and the numbers match again. Song Order mode takes care of itself either way, because it selects by position rather than by a number you assigned.
Sending MIDI from a Song Timeline
MIDI goes out as well as in. A Song Timeline can hold MIDI cues that fire at a point in the Song and send to a real port on your machine: notes on, notes off, control change, program change, pitch bend, channel pressure, poly pressure, and SysEx. That is how you get Visibox to change a patch on a rack unit or arm a light board on cue, without a separate sequencer running alongside it. Turn on Settings > General > Enable Beta Features to see this.
MIDI Monitor
The MIDI Monitor is a diagnostic window showing messages as they arrive. It is the first place to look when a controller is not doing what you expect, because it shows whether Visibox is receiving anything at all.
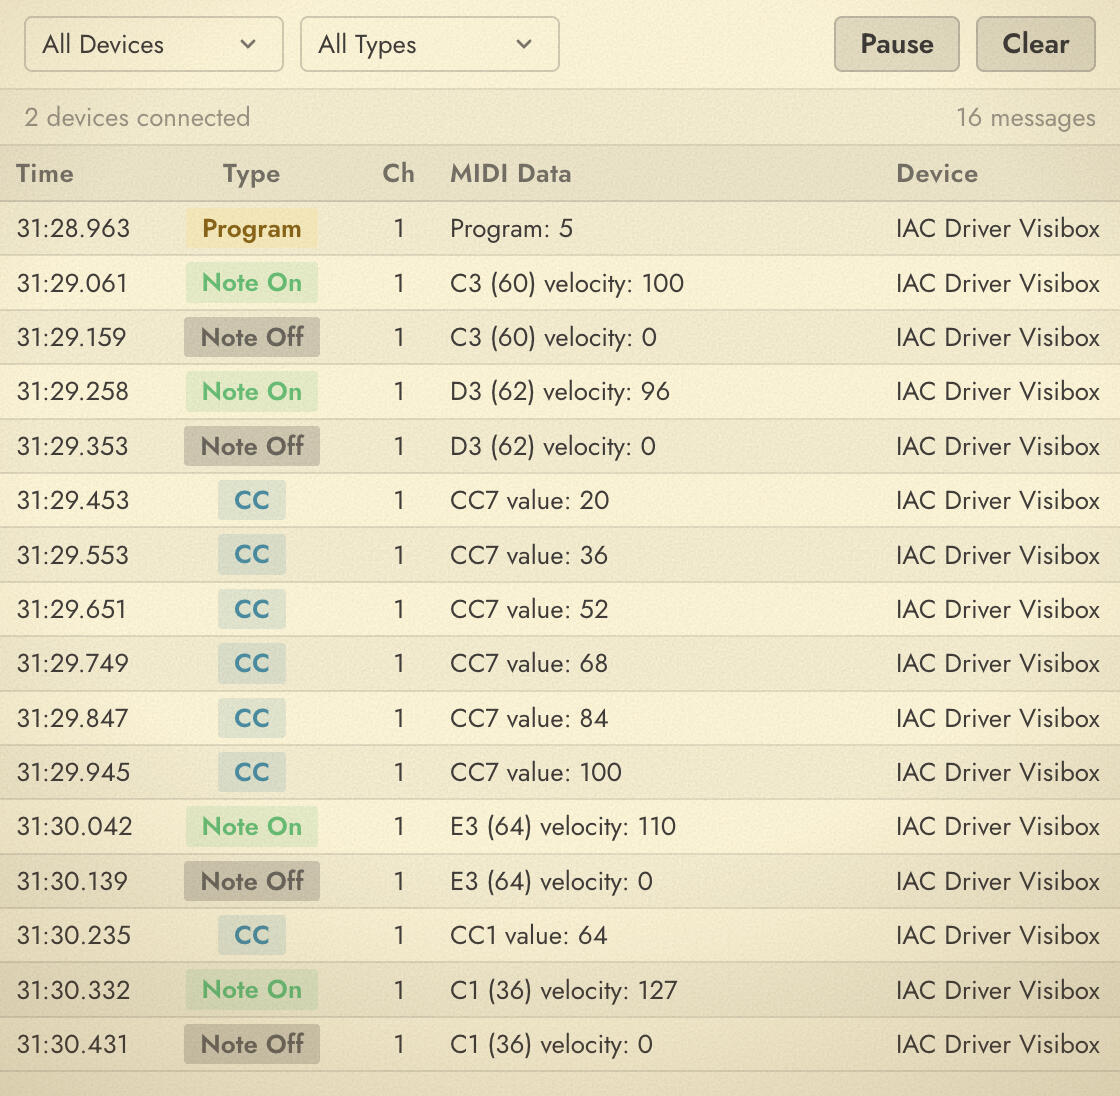
Open it from the menu bar, or with the keyboard:
- Mac: Visibox > MIDI Monitor…, or ⌥⌘M.
- Windows: File > MIDI Monitor…, or Ctrl+Alt+M.
The window lists:
| Column | Description |
|---|---|
| Time | When the message arrived (minutes:seconds.milliseconds) |
| Type | Note On, Note Off, CC, Program and so on |
| Ch | The MIDI channel, 1 to 16 |
| MIDI Data | The detail: note name, velocity, CC value |
| Device | Which device sent it |
The dropdowns at the top filter by device and by message type. Pause freezes the list so you can read it, and Clear empties it.
Work through it in order. If pressing a pad shows nothing, the device is not connected or is turned off in Settings > MIDI. If messages appear but nothing fires, the note or CC number does not match what is in the map on that same category.