Using MIDI in Visibox
While it is possible to select Songs and trigger Clips using the mouse and computer keyboard, Visibox really comes alive when you connect one or more MIDI devices. Not only can you control all of the performance aspects of Visibox, many MIDI devices will also light up to show you what is happening without needing to look at the Controller display.
Attaching and configuring MIDI devices
Most modern MIDI devices will have a USB connection. Just connect the device’s USB to your computer (directly or through a USB hub) and Visibox should recognize it. If your MIDI device does not have a USB connection, you can find an inexpensive MIDI-to-USB and use that.
In order to use a MIDI device with Visibox, it will need to send either MIDI note information or continuous control (CC) messages. While this covers the vast majority of piano-keyboard-style, drum-pad-style, and drum-machine-style MIDI controllers, some MIDI pedals only send program change messages. When choosing a MIDI device to use with Visibox, just make sure it can send MIDI note or CC messages.
The best Visibox controllers will also receive MIDI messages in order to display an indicator (probably an LED) associated with each note/pad/trigger. Visibox will light up these LEDs to show how many Clip slots are available in the current song. And while a clip is playing Visibox will flash the LED associated with the trigger pad for that clip.
To map specific pads/keys on your MIDI device to specific functions in Visibox, open the MIDI Map window (found under Visibox > Settings > MIDI Map).
New MIDI devices will automatically be enabled as MIDI inputs for Visibox. If you would like to disable one, visit Visibox > Settings > MIDI Inputs and deselect your device. To allow your device to receive MIDI from Visibox, visit Visibox > Settings > MIDI Outputs and enable your device.
The MIDI Map Window
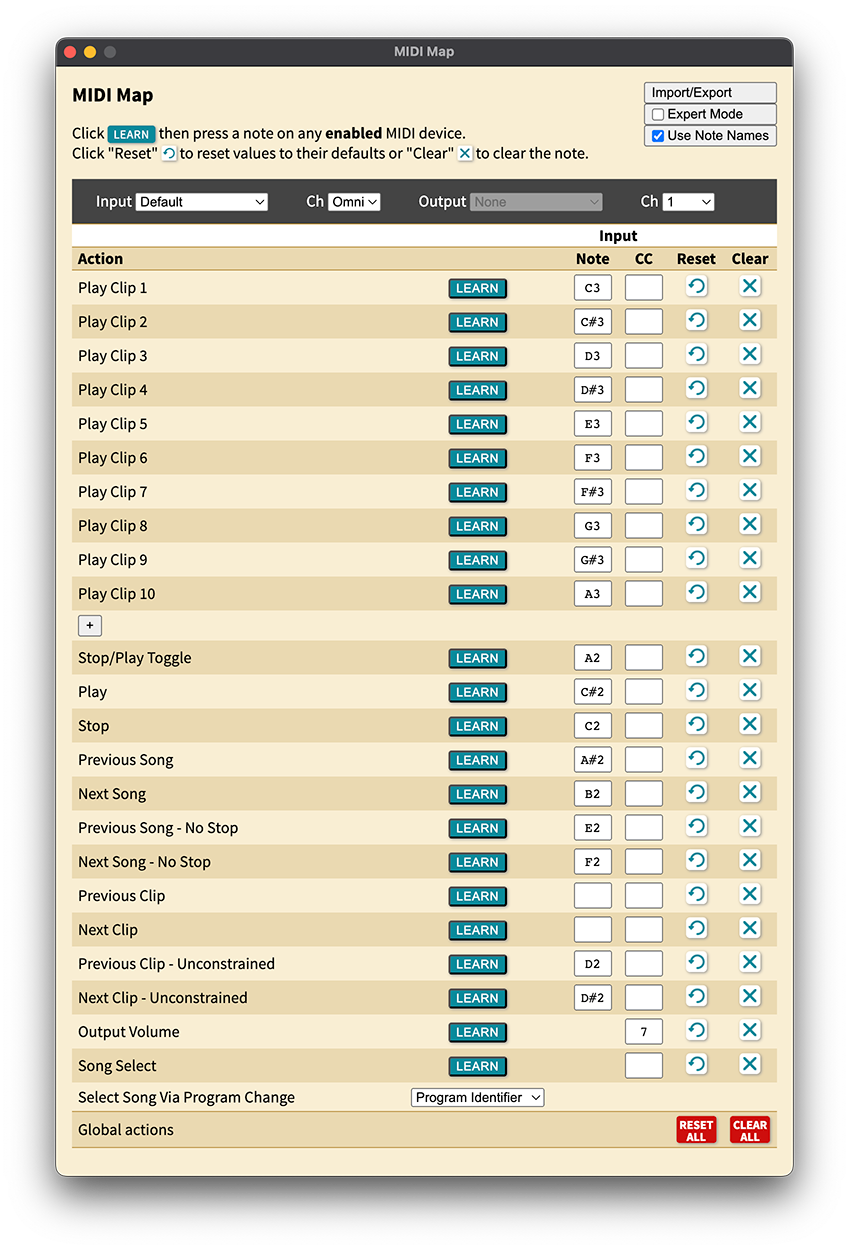
The MIDI Map window is where you configure how your MIDI controller communicates with Visibox. Open it from Visibox > Settings > MIDI Map.
Selecting a Device
At the top of the window you’ll find the device selection bar:
- Input: Choose the MIDI device you want to configure. Each device gets its own independent set of mappings. You can also select Default to configure a fallback map used when no device-specific map exists.
- Channel: Choose which MIDI channel to listen on (1–16), or select Omni to listen on all channels.
- Feedback: Enable or disable LED feedback for this device (see MIDI Feedback below).
Mapping Actions
The main section of the window is a table of actions — these are the functions in Visibox that you can trigger from your MIDI controller. Each row represents one action and has columns for:
| Column | Description |
|---|---|
| Action | The Visibox function (e.g., “Play Clip 1”, “Next Song”) |
| Learn | A button to enter learn mode for that action |
| Note | The MIDI note number (0–127) assigned to this action |
| CC | The MIDI CC number (0–119) assigned to this action |
The following actions can be mapped:
| Action | Description |
|---|---|
| Play Clip 1–10+ | Trigger a specific Clip by index. Use the More button at the bottom of the list to add additional Clip slots beyond the default 10. |
| Play | Start playback |
| Stop | Stop playback |
| Stop/Play Toggle | Toggle between stopped and playing |
| Pause | Pause the current Clip |
| Resume | Resume a paused Clip |
| Pause/Resume Toggle | Toggle between paused and playing |
| Previous Clip / Next Clip | Move to the adjacent Clip within the current Song |
| Previous Clip / Next Clip (Unconstrained) | Move to the adjacent Clip, continuing playback without stopping |
| Previous Song / Next Song | Switch to the adjacent Song, stopping playback |
| Previous Song / Next Song (No Stop) | Switch to the adjacent Song without stopping playback |
| Output Volume | Control the master output volume (CC only — maps a 0–127 CC value to the volume range) |
Each action can be assigned a MIDI Note, a CC, or both — though most actions use one or the other. Some actions like Output Volume only accept CC input, since they need a continuous value range.
How Note and CC Triggers Work
MIDI Notes work as you’d expect — pressing a pad or key sends a Note On message, which triggers the action. Releasing the pad sends Note Off (or Note On with velocity 0), which Visibox ignores. So each press fires the action once.
MIDI CC messages work similarly for trigger-style actions (Play, Stop, Clip triggers, etc.). Since CC messages carry a value from 0–127, Visibox treats them like momentary buttons:
- Any non-zero value (1–127) triggers the action — this is the “press”
- A value of 0 is ignored — this is the “release”
This means you can use momentary MIDI buttons that send CC 127 on press and CC 0 on release, and the action will only fire once per press, just like a Note trigger.
The exceptions are actions that use the full CC range as a continuous value:
- Output Volume — maps the CC value (0–127) to the volume range
- Song Select actions — use the CC value to select a specific song
For these actions, every CC value is meaningful, including 0.
Each MIDI note or CC number can only be assigned to one action at a time. If you assign a note that’s already in use elsewhere, Visibox will automatically clear the previous assignment.
Using Learn Mode
The easiest way to set up your mappings is to use Learn mode rather than typing in note or CC numbers manually:
- Click the Learn button next to the action you want to map.
- The input field highlights to show it’s listening.
- Press the pad, key, or move the knob on your MIDI controller.
- Visibox captures the MIDI message and fills in the note or CC number automatically.
- Learn mode automatically advances to the next action, so you can quickly map multiple controls in sequence.
While in Learn mode, you can also use the keyboard:
- ↑ / ↓ — Move to the previous or next action
- Backspace or Delete — Clear the current mapping
- Escape — Exit Learn mode
Music Notation
By default, MIDI notes are displayed as numbers (0–127). Check the Music Notation option at the top of the window to display note names instead (e.g., C4, D#5). This can be helpful if you’re more familiar with musical note names than MIDI numbers.
Resetting Mappings
Each row has Reset and Clear buttons:
- Reset restores the action to its factory default mapping
- Clear removes the mapping entirely
At the bottom of the table, Reset All and Clear All apply to every action in the map.
Import and Export
You can save and load MIDI maps using the Import/Export button at the top of the window. Maps are saved as .vsbmm files (Visibox MIDI Map). This is useful for:
- Backing up your mappings before making changes
- Sharing mappings with other Visibox users who have the same controller
- Quickly switching between different mapping configurations
MIDI Feedback
MIDI Feedback allows Visibox to send signals back to your MIDI controller to light up LEDs and indicators, giving you visual confirmation of what’s happening without looking at the screen.

To enable MIDI Feedback:
- Select your MIDI device from the Input dropdown in the MIDI Map window
- Check the Feedback option for that device
- Ensure your device is also enabled in Visibox > Settings > MIDI Outputs
When MIDI Feedback is enabled, Visibox sends MIDI messages back to your controller using the same note numbers as the input mappings. So if note 60 is mapped to Play Clip 1, Visibox will send note 60 back to light up that pad. The LED behavior indicates the current state:
- Solid: The Clip is available (loaded in the active Song) but not currently playing
- Fast blink: The Clip is currently playing
- Slow blink: The Clip is paused
- Off: The Clip slot is inactive (not part of the current Song) or has no mapping
When you switch Songs, Visibox performs a brief “flourish” animation, lighting up each available Clip in sequence. This gives you a quick visual confirmation of which pads are active for the new Song.
MIDI Feedback works best with controllers that have LEDs or backlit pads, such as the Novation Launchpad, Akai APC series, or similar grid controllers.
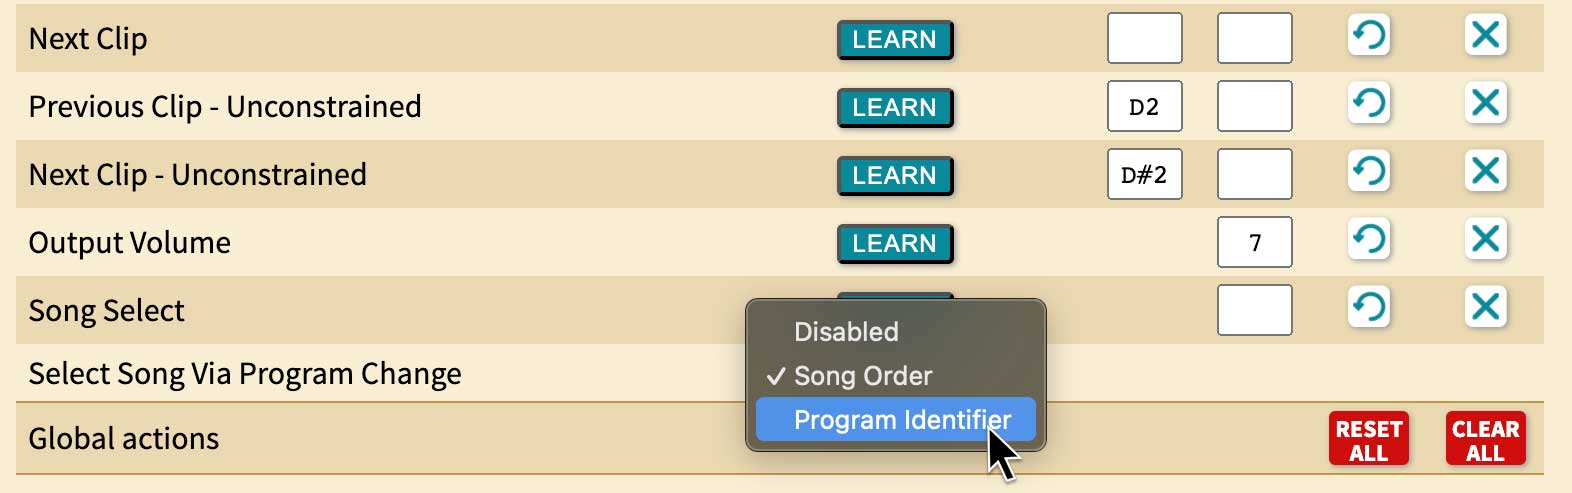
Selecting Songs Via MIDI Program Change
If you have a MIDI device or software that sends MIDI Program Change messages, you can use these to select Songs in Visibox. To set this up, go to Visibox > Settings > MIDI Map and select the input for the MIDI device that will send Program Change messages. Scroll to the bottom and find the “Select Song By Program Change” option. From the dropdown menu choose either “Song Order” or “Program Identifier”:
- Song Order: The Program Change message will select using the order of Songs in your Project. Program Change 0 will activate the first Song, Program Change 1 will activate the second Song, and so on.
- Program Identifier: The Program Change message will select the Song with the corresponding Program ID. You can choose the Program ID for each Song, by right clicking on the Song in the Controller window and selecting a numeric ID from “Program Identifier” submenu. Song titles are listed next to assigned Program IDs in the list. Selecting an assigned Program ID will swap the current Song’s Program ID with that of the assigned Song.
While MIDI Program Change messages are always in the range of 0-127, many hardware controllers (and some software) will display these as 1-128. So, for example, selecting “1” on the controller will actually sending Program Change 0 to Visibox. Since we’re selecting the first Song, this is actually more intuitive than it sounds. Program Identifiers are also numbered 1-128, so depending on what type of a device you’re using to send the Program Change messages, you may need to shift your values by 1.
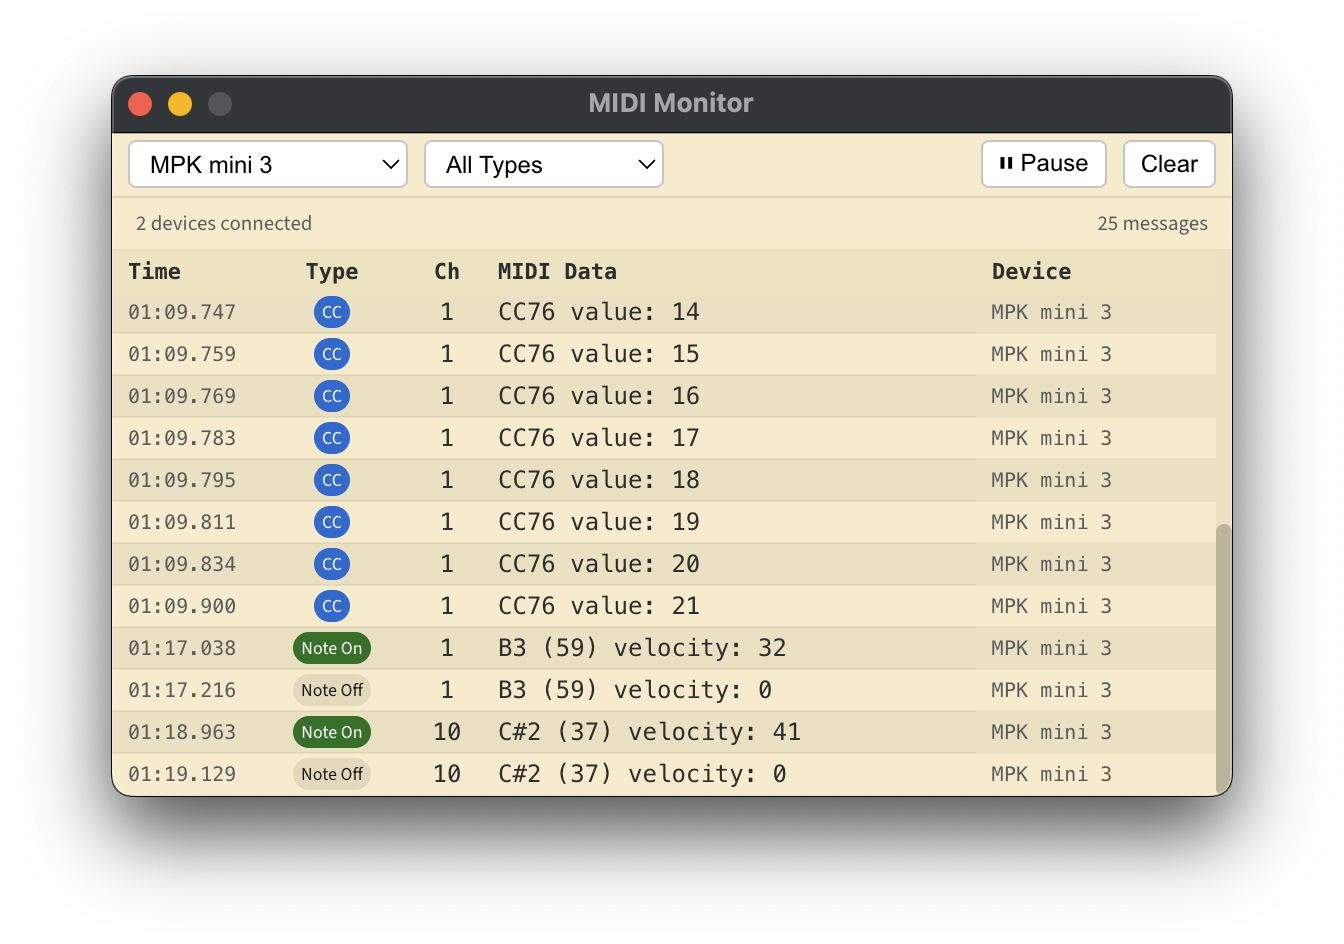
MIDI Monitor
The MIDI Monitor is a diagnostic window that displays real-time MIDI messages from your connected devices. It’s invaluable for troubleshooting your MIDI setup—you can see exactly what messages Visibox is receiving when you press pads, turn knobs, or send program changes.
To open the MIDI Monitor:
- Mac: Visibox > Settings > MIDI Monitor…
- Windows: Window > MIDI Monitor…
The MIDI Monitor window displays:
| Column | Description |
|---|---|
| Time | When the message was received (minutes:seconds.milliseconds) |
| Type | The type of MIDI message (Note On, Note Off, CC, Program, etc.) |
| Ch | The MIDI channel (1-16) |
| MIDI Data | Details about the message (note name, velocity, CC value, etc.) |
| Device | Which MIDI device sent the message |
Filtering messages:
Use the dropdown menus at the top to filter what’s displayed:
- Device filter: Show messages from all devices or just a specific one
- Type filter: Show all message types or only Note On, CC, Program Change, etc.
Controls:
- Pause/Resume: Stop the display from scrolling to examine specific messages
- Clear: Remove all messages and start fresh
If you’re having trouble getting a MIDI controller to work with Visibox, open the MIDI Monitor first. Press buttons on your controller and watch what appears. If nothing shows up, the device may not be connected properly or may not be enabled in MIDI Inputs. If messages appear but don’t trigger Clips, check that the note numbers or CC values match what’s configured in your MIDI Map.