Using MIDI in Visibox
While it is possible to select Songs and trigger Clips using the mouse and computer keyboard, Visibox really comes alive when you connect one or more MIDI devices. Not only can you control all of the performance aspects of Visibox, many MIDI devices will also light up to show you what is happening without needing to look at the Controller display.
Attaching and configuring MIDI devices
Most modern MIDI devices will have a USB connection. Just connect the device’s USB to your computer (directly or through a USB hub) and Visibox should recognize it. If your MIDI device does not have a USB connection, you can find an inexpensive MIDI-to-USB and use that.
In order to use a MIDI device with Visibox, it will need to send either MIDI note information or continuous control (CC) messages. While this covers the vast majority of piano-keyboard-style, drum-pad-style, and drum-machine-style MIDI controllers, some MIDI pedals only send program change messages. When choosing a MIDI device to use with Visibox, just make sure it can send MIDI note or CC messages.
The best Visibox controllers will also receive MIDI messages in order to display an indicator (probably an LED) associated with each note/pad/trigger. Visibox will light up these LEDs to show how many Clip slots are available in the current song. And while a clip is playing Visibox will flash the LED associated with the trigger pad for that clip.
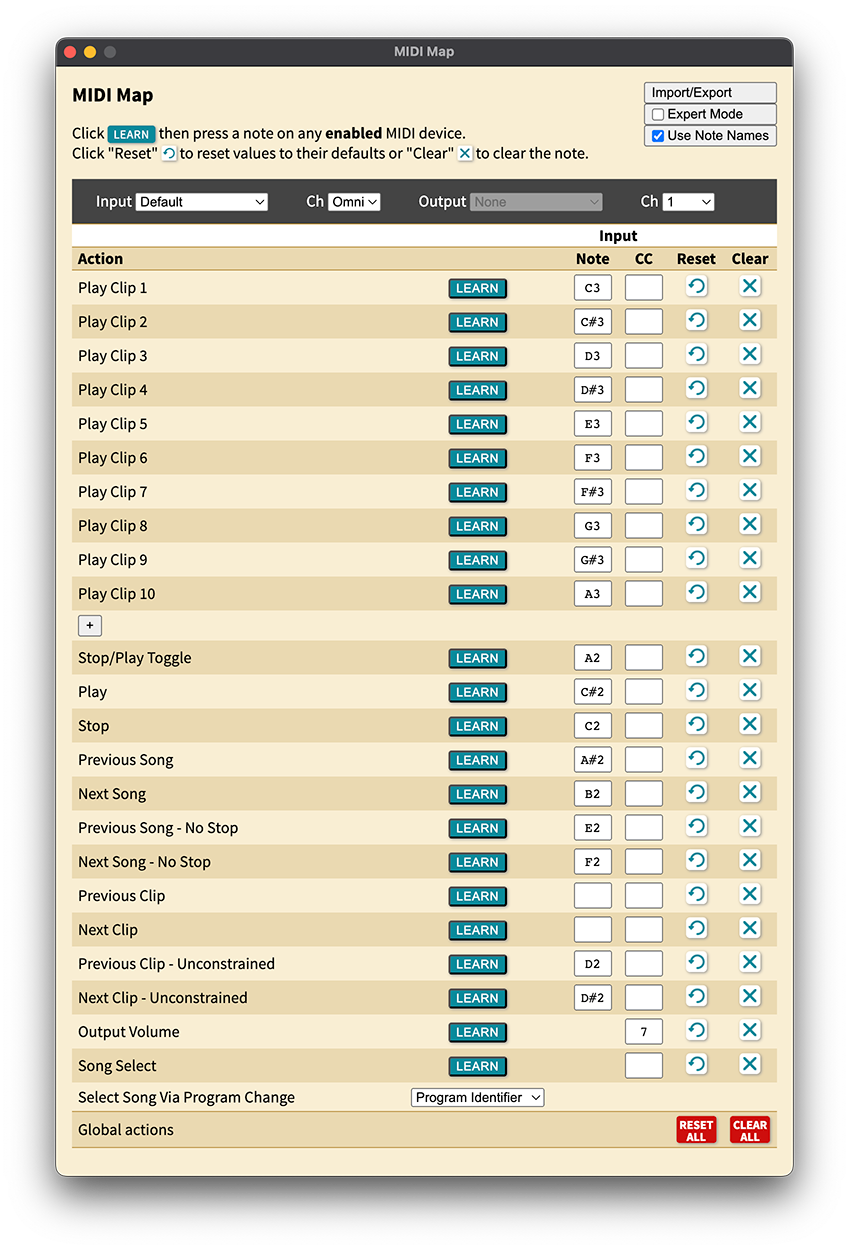
To map specific pads/keys on your MIDI device to specific functions in Visibox, open the MIDI Map window (found under Visibox > Preferences > MIDI Map).
Select your device from the MIDI Input menu selector at the top of the window. Your device should also be selected as the MIDI Output. You can enter MIDI note numbers or CC ids manually. However, the easier thing to do is to hit “Learn” next to the function you would like to control. Then hit the pad/key on your device that you would like to use to control it. Do this for all of the pads/keys you would like to use.
Visibox will send MIDI messages to your device using the same settings as the input trigger in the MIDI Map. So if note 44 is set to trigger your first clip, note 44 will be sent to the MIDI device to indicate that the first clip is enabled and/or playing.
New MIDI devices will automatically be enabled as MIDI inputs for Visibox. If you would like to disable, visit Visibox > Preferences > MIDI Inputs and deselect your device. To allow your device to receive MIDI from Visibox, visit Visibox > Preferences > MIDI Outputs and enable your device.
Selecting Songs Via MIDI Program Change
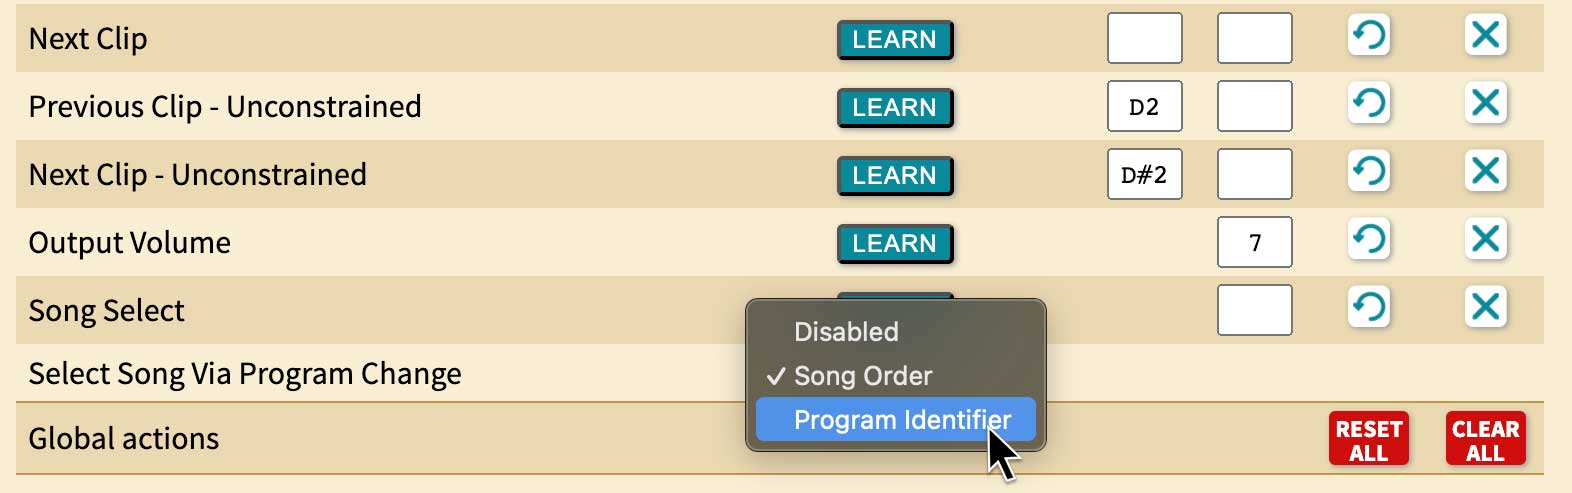
If you have a MIDI device or software that sends MIDI Program Change messages, you can use these to select Songs in Visibox. To set this up, go to Visibox > Preferences > MIDI Map and select the input for the MIDI device that will send Program Change messages. Scroll to the bottom and find the “Select Song By Program Change” option. From the dropdown menu choose either “Song Order” or “Program Identifier”:
- Song Order: The Program Change message will select using the order of Songs in your Project. Program Change 0 will activate the first Song, Program Change 1 will activate the second Song, and so on.
- Program Identifier: The Program Change message will select the Song with the corresponding Program ID. You can choose the Program ID for each Song, by right clicking on the Song in the Controller window and selecting a numeric ID from “Program Identifier” submenu. Song titles are listed next to assigned Program IDs in the list. Selecting an assigned Program ID will swap the current Song’s Program ID with that of the assigned Song.
While MIDI Program Change messages are always in the range of 0-127, many hardware controllers (and some software) will display these as 1-128. So, for example, selecting “1” on the controller will actually sending Program Change 0 to Visibox. Since we’re selecting the first Song, this is actually more intuitive than it sounds. Program Identifiers are also numbered 1-128, so depending on what type of a device you’re using to send the Program Change messages, you may need to shift your values by 1.