Audio in Visibox
Audio Outputs
Any connected audio interfaces will show up under Visibox > Preferences > Audio Output. The first item in this list will simply default to the audio output you’ve chosen in your system settings. You may just use your computer’s built-in output with Visibox. But if you have a higher quality audio interface that you want to use, you could set your system settings to use the built-in audio output (probably the built-in speakers on your laptop), and then set Visibox to use your external audio interface. This will ensure that any alerts or messages that you receive on your computer will come out of your internal speakers and not accidentally go out to the audience.
If you have an audio interface connected for performance, it’s usually a good idea to leave the system audio going through the internal speakers while any audio from Visibox goes through your external interface. This way, any system notifications, sound effect, or other noises don’t go out to your audience.
Multichannel Audio
While the majority of build-in audio interfaces on laptops and desktops are stereo, you can also use Visibox with multichannel audio interfaces. On the Mac, Visibox will see all of the outputs that your interface offers. On Windows, you can access up to 8 outputs, but you will need to configure your audio interface in the Windows Sound settings - see below.
Most multichannel interfaces come with configuration software that allows you to set the output routing. For example, you might want to use your interface’s ADAT light pipe outputs as channels 1-8. Visibox will see this routing and span your multichannel audio across the outputs starting at channel 1.
Configuration on Mac
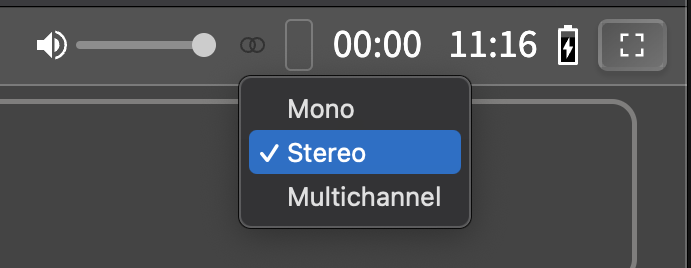
On the Mac, Visibox will automatically detect any connected multichannel audio interfaces. You can set your audio interface as the output device in Visibox by going to Visibox > Preferences > Audio Output and selecting your interface from the list. If you have a multichannel interface connected, it will show up with all of its outputs available.
Configuration on Windows
Once your audio interface is connected and its drivers have been installed, you can configure it in the Windows Sound settings. Open Settings, then select System > Sound > More Sound Settings. Then select your audio interface and click the Configure button. In the popup window, choose 7.1 Surround Sound if you want to use all 8 outputs.
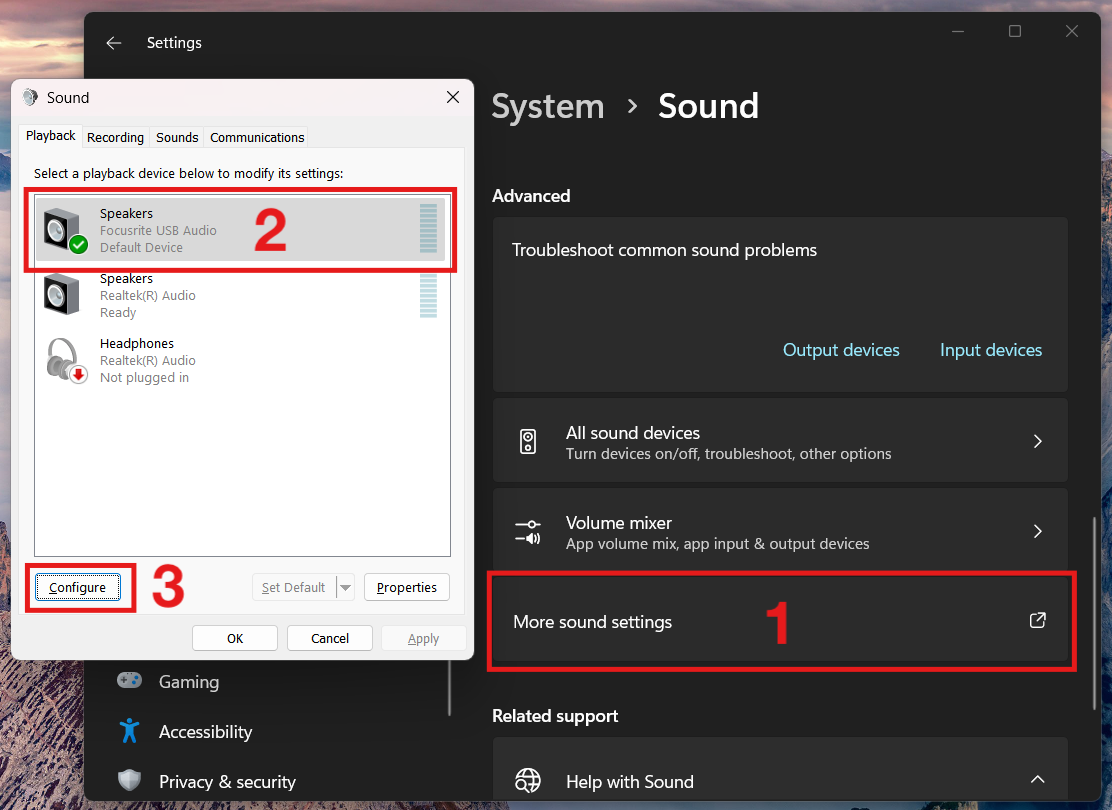
Open the Sound panel. Then click “More sound settings” to open the window. Select your multichannel audio interface. Then click the “Configure” button to set it up for multichannel output.
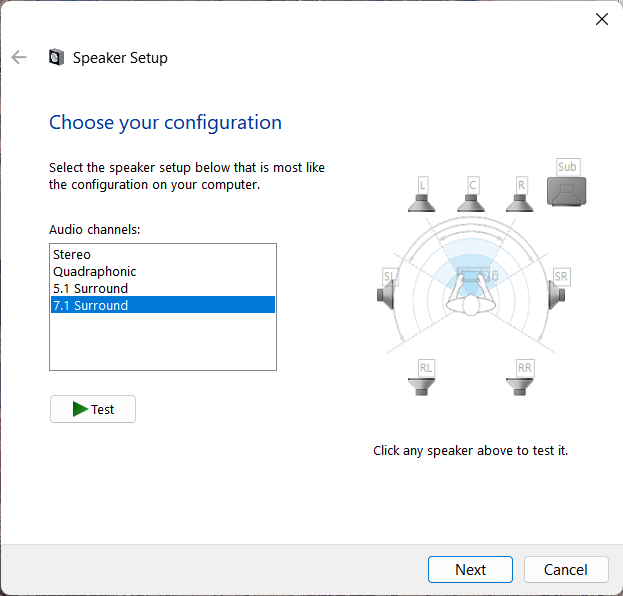
In the popup window, select “7.1 Surround” to enable all 8 outputs.
If you have a multichannel interface connected and you’re not seeing it listed or you’re not seeing a 7.1 Surround option, make sure the you have the latest drivers, the latest system updates, everything is installed correctly, and that the interface is set up for multichannel output in its own configuration software.
Downmixing
Visibox offers three modes for audio output: Stereo, Mono, and Multichannel. You can select the desired mode by right clicking on the icon next to the output meter in the Control Bar at the top of the Controller window.
The modes work as follows:
- Mono: Audio plays in dual mono, with the same signal sent to channels 1 and 2. Stereo source audio will be downmixed to mono, and multichannel source audio will be downmixed to mono with all channels mixed together.
- Stereo: The audio is output in stereo, using channels 1 and 2 of your interface. Mono source audio will play equally in both channels. Multichannel source audio will be downmixed to stereo with odd channels on the left and even channels on the right.
- Multichannel: Audio is output in its original multichannel format, with each channel sent to its corresponding output. No downmixing will happen no matter how many outputs are in your source or output interface. Mono files will play in dual mono on channels 1 and 2. Stereo files will play in stereo on channels 1 and 2. Multichannel files will play across all available outputs, starting at channel 1.
Click the icon next to the output meter in the Control Bar to change the audio output mode.
Multichannel Metering
When you’ve got multichannel audio files (more than 2 channels) in your Project and Visibox is in multichannel playback mode (see above), Visibox will display a multichannel meter in the Control Bar. This meter will show playback levels for any playing audio or video files. If your audio interface has fewer output channels than the file, the “extra” channels will be displayed as outlined meters. For example, if you have a 6-channel audio file playing on a 4-channel interface, channels 5 and 6 will be outlined in the meter.

An 8 channel audio file playing on a stereo interface. Channels 3-8 are outlined because they are not being output. Note the multichannel icon next to the output meter in the Control Bar.

An 8 channel audio file playing on a 32-channel interface.
Combining Stem Files
In addition to playing multiple Clips per Song in Visibox, you can attach a single audio file to each Song. These can be mono, stereo, or multichannel files such as WAV, AAC, MP3, or FLAC.
However, outputting a multichannel audio file from a DAW (Logic, Pro Tools, etc.) is far from straightforward. Most of these tools are oriented toward creating “surround” audio, but this can be a challenging interface when you want to output a multichannel file that contains multiple stems (e.g. drums, bass, guitar, vocals).
Luckily, Visibox can combine multiple audio files into a single multichannel file! Here’s how to do it:
-
Output your stems from your DAW as separate audio files. For example, you might have a stereo click track that the drummer will hear; a stereo click track that the rest of the band hears; a stereo mix of keyboards; and a stereo mix of backing vocals and sound effects. That is four separate stereo files that you want to combine into a single 8-channel multichannel file. These files can be either an uncompressed format like WAV, or a compressed format like AAC or MP3.
-
Ensure the files are named so they will sort alphabetically in the order you want them to play. For example, you might name them “01 Click Track Drummer”, “02 Click Track Band”, “03 Keyboards”, and “04 Backing Vocals and Sound Effects”.
-
In Visibox, create or find your Song and attach the audio files to it. You can do this by either:
a. Right-clicking on the Song and selecting Attach Audio, then selecting the multiple stem files you want to combine.
b. Dragging all of the files from your file browser directly onto the Song in the Controller window.
c. Copying the files from your file browser, then pasting them onto the Song in the Controller window. -
Visibox will pop up a dialog asking you to confirm the combination of the files. Click “OK” and Visibox will generate a new multichannel audio file that contains all of the stems in the order you specified.
Once the file is generated, it will be attached to the Song and you can play it back like any other audio file. Visibox displays an icon with three interlocking circles to indicate it has a multichannel audio file attached.
Multichannel Playback Limitations
Currently, Visibox can only play back multichannel audio files up to 8 channels. If you try to combine or play back a file with more than 8 channels, Visibox will display an error message. This is due to limitations in the audio engine and the way multichannel files are handled in the current version of Visibox. We are working on expanding this limit in future releases.
Existing Multichannel Audio and Video Files
If you already have a multichannel audio or video file that you want to use in Visibox, you can simply drag them onto the Song in the Controller window. Visibox will recognize it as a multichannel file and will play it back across all available outputs. Keep in mind though that the layout of the channels in, for instance, a 5.1 surround sound file may not match the layout of your audio interface. Visibox will play the channels in the order they are defined in the file, so you may need to adjust your audio interface’s routing to match.