Working with Clips
Once you have one or more Songs added to the Project, you can begin adding the visual Clips.
The easiest way to add a Clip is to drag the video or image file from the desktop directly into the Song frame. Alternately, you can select single or multiple files from the desktop and use the Explorer/Finder’s “Copy” command. Then, select the target Song in Visibox and use the “Paste” command. You could also add a Clip with a menu option (Song > Add Clip) or by right-clicking on the Song and selecting Add Clip there. Or if keyboard shortcuts are your thing, ⇧⌘C will get the job done. When the Clip is added to the Song, its thumbnail appears in the Song frame.
Rearrange the Clip sequence by grabbing a Clip thumbnail and dragging it into the new position. The ⌘< and ⌘> shortcuts move the selected Clip to the left and right, respectively. You can also drag a Clip from one song to another.
To duplicate a Clip, right-click on its thumbnail and select Duplicate or use the ⌘D shortcut. Duplicate Clips can be dragged into other Songs. Visibox is optimized to use a single media file as the source for all duplicates of a Clip, so duplicates do not use up more disk space.
Selecting Multiple Clips
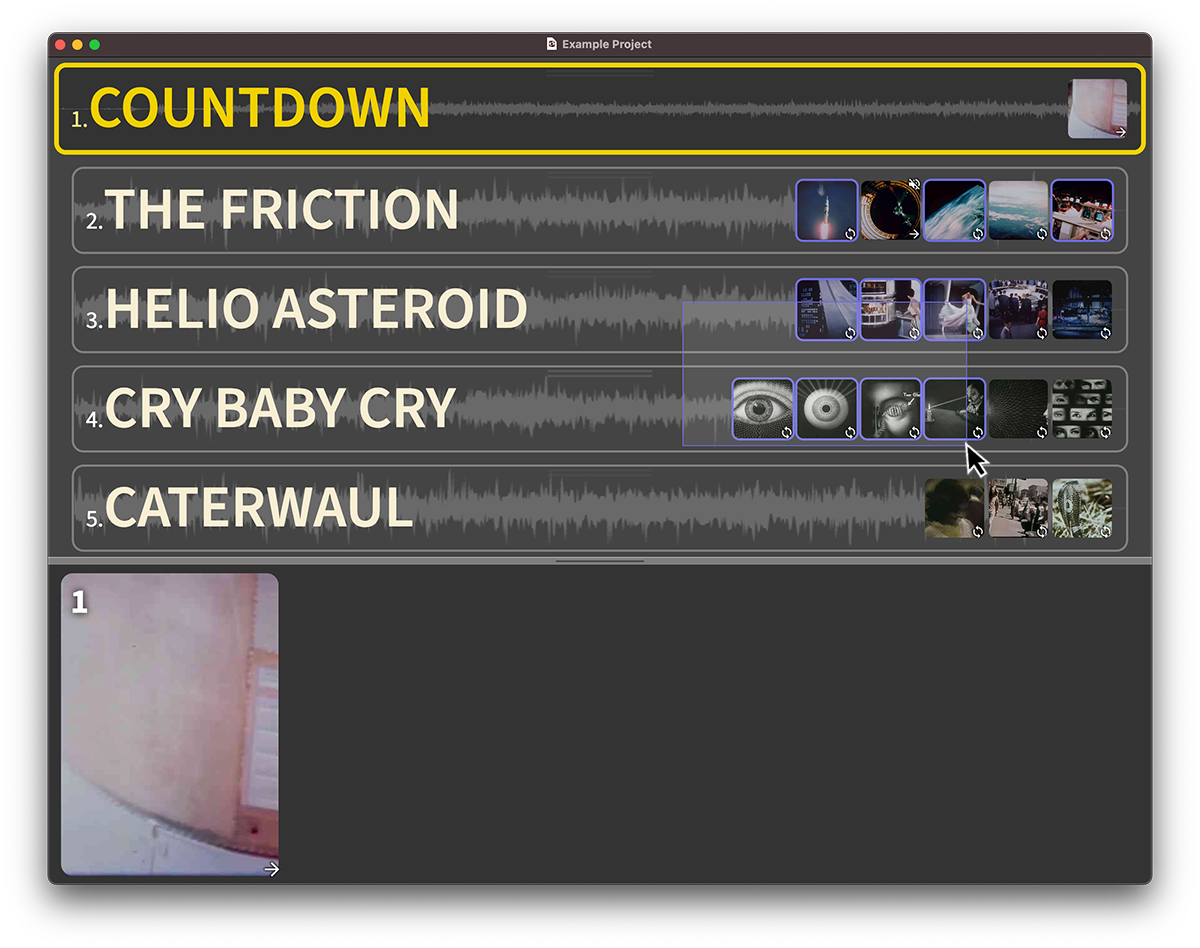
Similar to the Mac or Windows operating system, multiple Clips can be selected at once by clicking the mouse outside of a Clip and dragging a rectangle around multiple clips at once. Selected Clips are outlined in blue. Repeat this behavior while holding down the shift (⇧) key to add more Clips to the selection. Hold down the alt/option (⌥) key to remove Clips from the selected group. Hold down the command (⌘) key on Mac or control (⌃) key on Windows and click individual Clips to toggle their selection status.
You can select all Clips with the Select All Clips (⌘A) menu item. You can deselect any selected Clips with Deselect All Clips (⇧⌘A) or by clicking outside of any selected Clips in the Controller window.
Setting Options For Multiple Clips At Once
When multiple Clips are selected, you will be able to drag them, duplicate them, or delete them together. You will also be able to edit their common options together. For instance, if all selected Clips are video Clips, you can change all of the “When Clip Ends” behavior for all Clips at once. However, if you have a mix of different types of Clips, some options may not be available. For instance, if you have both video and image Clips selected, you will not be able to edit the “When Clip Ends” behavior because this is not an option for image Clips.

Copying Clips between Projects
Clips can be copied between Projects by dragging them from one Project to another. You can drag one clip, or select multiple Clips and drag them all at once. This is a great way to reuse Clips across multiple Projects. Simply open both Projects at once, select the clips you want to copy, and drag them to the target Project. This will copy the Clips, along with all of their settings, to the target Project. Note that this will copy the media files as well, so it may take a moment depending on the size and quantity of these files.
Clip audio
If the video file has audio, that audio plays when the Clip plays. To prevent the audience from hearing the audio, you can mute it by right-clicking the Clip thumbnail and selecting Mute (that option is also available in the Clip menu at the top). You can also adjust the volume for the Clip, which is useful for balancing the sound level across Clips and with your performance.
Clip resuming behaviors
The very first time you play a clip, it will play from the beginning. The When Resuming options allow you to choose what happens when you come back to play this Clip again after playing another Clip. You can choose to either Restart From The Beginning or Resume From Last Point. The second of these is good if you‘ve got a longer video clip and you want to pick up where you left off when you switched away.
To change the resuming behavior, right-click on the Clip and select an option from the When Resuming menu (you can also access the options from the Clip menu at the top).
Clip retriggering behaviors
“Retriggering” happens when you trigger a Clip that is already playing. The default behavior is to Restart a video from the beginning. However, Stutter allows you to jump back about 1 second. If you want to ensure that you do not accidentally retrigger a playing video, choose the Do Nothing option.
The retrigger behavior is indicated with an icon that displays centered below the progress line when the Clip is playing. Options include:
| Icon | Name | Description |
|---|---|---|
| Restart (default) | Clip plays from the beginning | |
| Stutter | Clip jumps back a short amount of time | |
| Scratch (Beta) | Clip scratches like a record, reversing and fast-forwarding at high speed for a moment | |
| Reverse (Beta) | Reverse playback direction | |
| Pause/Resume | Clip pauses, next trigger will resume from the paused position | |
| Pause/Restart | Clip pauses, next trigger will restart | |
| Stop | Clip stops and goes to black/background | |
| Do Nothing | Nothing happens |
Clip end behaviors
Visibox gives you a lot of control over what happens when a particular Clip ends. By default, the Clip loops automatically, allowing it to continue playing until you trigger the next Clip while performing. To change the end behavior, right-click on the Clip and select an option from the When Clip Ends menu (you can also access the options from the Clip menu at the top).
An icon in the bottom-right corner of the thumbnail (in both the Song frame and the Preview) indicates what happens at the end of the Clip. The options with their respective icons are as follows:
| Icon | Name | Description |
|---|---|---|
| Loop | (Default) Clip starts over | |
| Bounce (Beta) | Clip reverses direction when it reaches end/beginning | |
| Stop | Clip ends and goes to black or the background image; audio stops playing | |
| Freeze | Clip pauses on the last frame | |
| Start next clip | The next Clip starts playing automatically | |
| Cue next song | Activates the next Song but does not start playing |
Fade In/Out
The Fade In and Fade Out submenus let you apply a fade in or fade out to each Clip individually. Fades are applied to the Clip in real time, so they do not affect the original video file. Fade In additionally defines the crossfade (dissolve) time between the previous Clip and the current Clip. Any Fade Out value on the previous Clip is ignored when switching directly from one Clip to the next.
To apply a fade, right-click on the Clip(s) and select a time value from the Fade In or Fade Out submenus. Fade In and Fade Out icons appear in the lower left and lower right of the thumbnail when a value is set.
| Icon | Description |
|---|---|
| Fade In: Fade in or crossfade between Clips | |
| Fade Out: Fade out to black or Background Clip |
Rotate and Flip
The Rotate and Flip submenus let you rotate and/or flip each Clip individually.
Filters
The Filters submenu lets you apply filters to each Clip individually. Filters are applied to the video image in real time, so they do not affect the original video file. You can apply multiple filters to a single Clip. Filters include: Blur, Brightness, Contrast, Grayscale, Rotate Hue, Invert, Saturate, and Sepia.
Cropping and Letterboxing
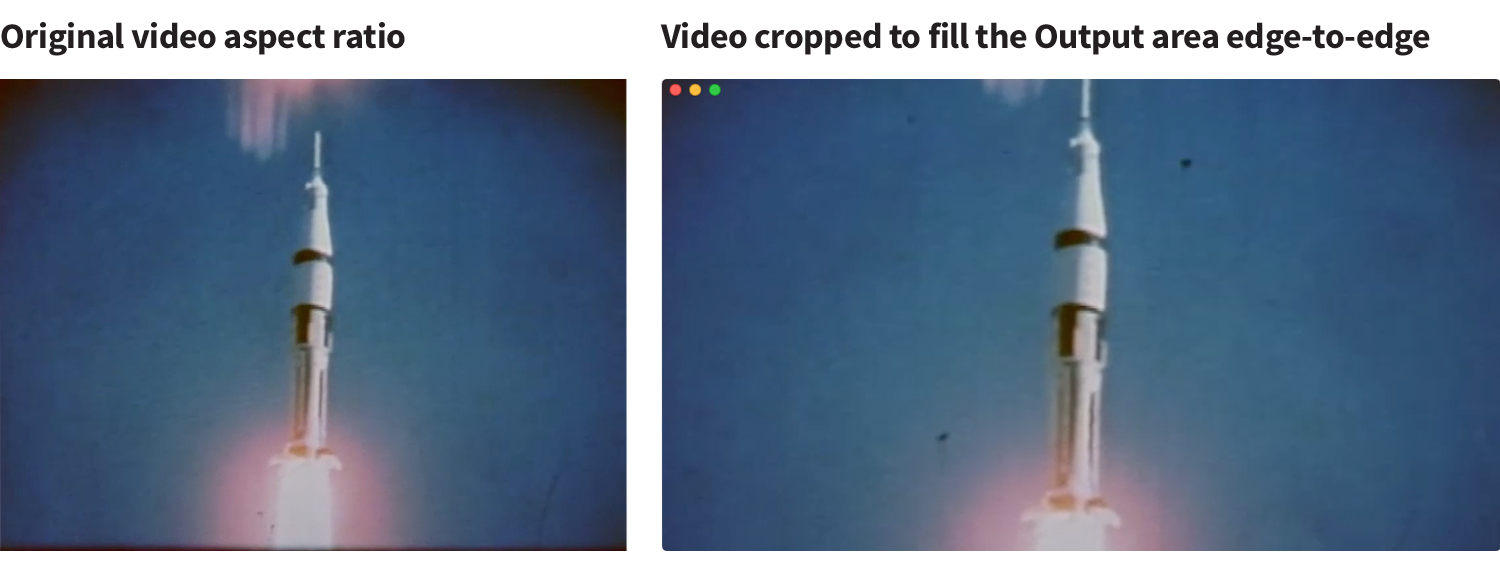
In most cases, videos for a live performance are intended to add visual texture and excitement to the stage, not to “show a video” per se. With this in mind, by default Visibox crops Clips to make them display edge-to-edge in the Output Window for consistency. The advantage is that you can use a variety of video sources without editing them beforehand to fit a particular display. Visibox just makes it work!
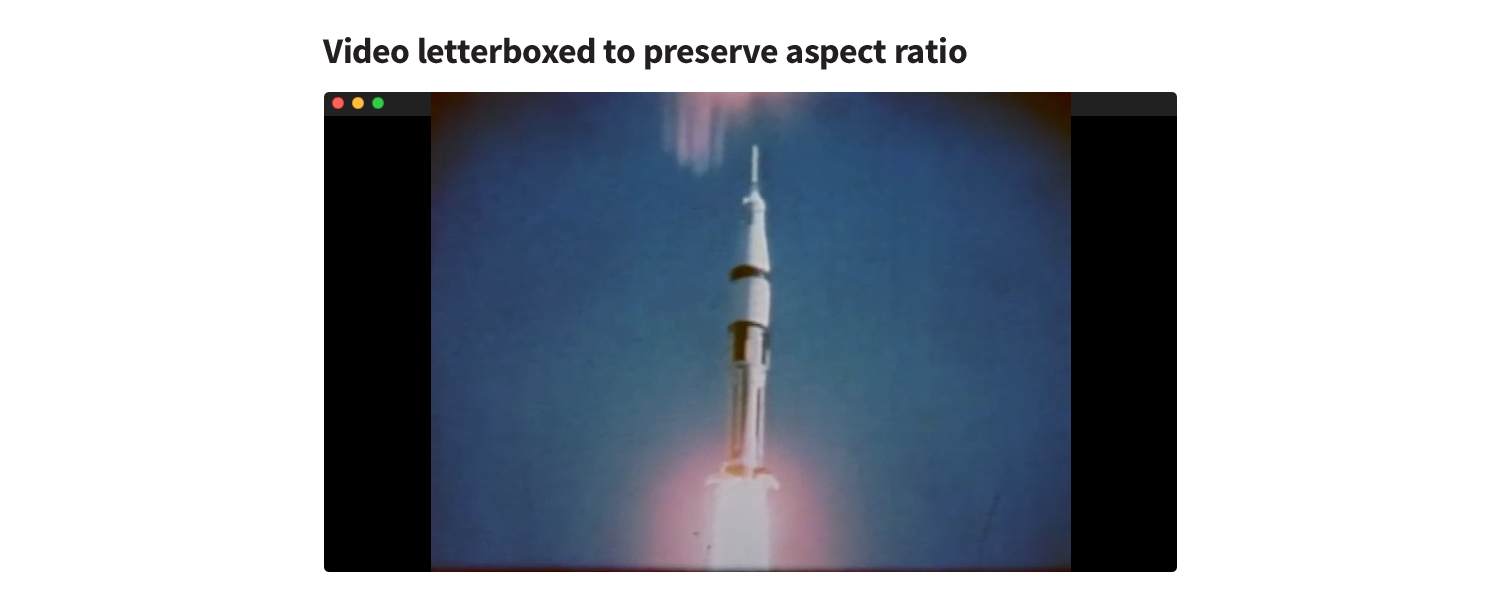
If you have a Clip that must be seen entirely without any cropping—for example, videos or images with text that should not be cut off—you can opt to “letterbox” the Clip. Letterboxing adds black bars as needed to show the whole video regardless of the aspect ratio of the final display. You can letterbox a particular Clip by right-clicking on its thumbnail and selecting Letterbox.
Note that if you need to letterbox all of the Clips in your project, you can also set Letterbox at the Project level (Project > Letterbox). The Project level setting becomes the default, which you can then override for each particular Clip.
Because video projectors, televisions, and computer monitors rarely conform to the aspect ratio of most common videos, it is recommended that you don’t activate Letterbox unless you have specific information in your video clips that you do not want cropped out. Most background videos are okay with a little cropping and this means that you won’t need to spend a lot of time editing your videos to ensure that they are exactly the same aspect ratio as your projector… or spend time at a gig trying to figure out why your projector is showing 16:10 instead of 16:9…or that the club’s projector is 4:3. Just turn off letterbox and let the Visibox Output conform to the space available.
Note that things can get a little weird when you combine Letterbox with Enforce Aspect Ratio. Pay attention to the Output window when you change these settings.
Playback speed
You can alter the speed of a video clip from within Visibox by right-clicking on the Clip thumbnail and selecting Speed from the contextual menu. There are several options ranging from 3x down to .1x normal speed. The same option is available in the Clip menu at the top.
Output View in the Preview Pane
With the Output View enabled in the Controller Window, you can see the content Output Window on your laptop screen while you perform. This is useful if you are using a projector or other display that is behind you.
By default, the Output will be cropped to conform to the aspect ratio of the Output View. If you want to ensure the Output does not get cropped, right-click on the Output View and select “Letterbox”.
The Output View can be resized by dragging the slider at the top of the Preview Pane or the slider to the right of the Output View. Double clicking on the vertical slider will disable the Output View.
Clips in the Preview Pane
When a Song is active, its Clips appear in the Preview pane at the bottom of the Controller window. Note that each Clip is assigned a number (top-left corner). You can trigger Clips by their reference number using the computer’s keyboard or a MIDI controller mapped to that Clip position. In other words, they do not necessarily need to play in the sequence in which they appear in the Preview. This is not a timeline; you can trigger any of these Clips at any time. They are there as a reference.
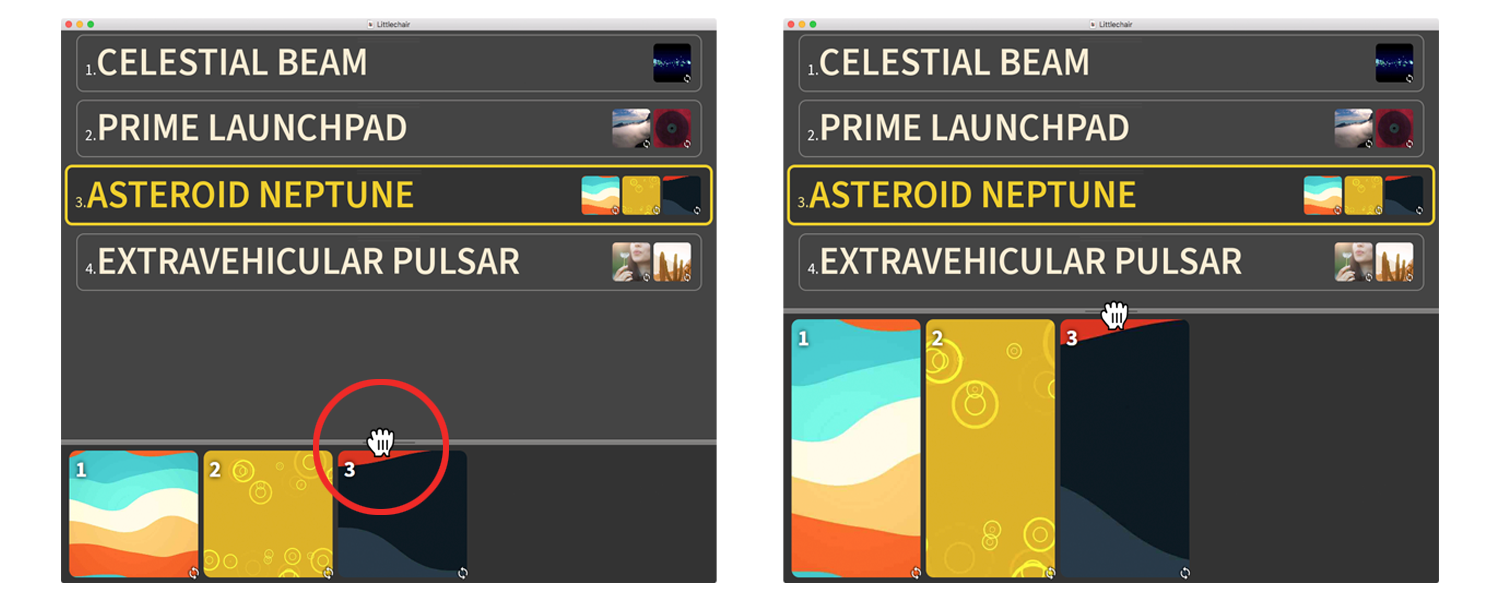
Grab the bar at the top of the Preview to make it larger or smaller. This is helpful for seeing what Clips are queued and available from a distance while you are on stage. You can also click on this bar to hide the Preview area entirely.
Seeking/Scrubbing Through Clips
You can seek or scrub through Video Clips in the Preview area by clicking on their progress bars. This is useful for finding a particular spot in a video Clip without playing from the beginning.
TRY IT!
Now that you know about adding and rearranging Songs and Clips, why not take Visibox for a quick spin?
You can download an fully configured Visibox Project from within Visibox (Help > Download/Open Example Project…). Trigger the first Clip in the first Song and watch it play in the Output Window. (Not seeing the Output window? Go to Window > Show All.) Try turning on or off Letterboxing to reveal the source video and how Visibox makes it work in the overall presentation.
Try editing the Song order. Rename some Songs. Move some Clips around. Pay attention to their end behaviors and watch what happens when they play in the Output window. Try changing the end settings.
Try adding your own Clips to a song. Any video you have will work to play around with. If you don’t have a video, you can use an image.