Setting Up for Live Performance
When you arrive at the performance venue, you will need to set up your laptop and display device (likely a projector). In this section, we’ll cover the basic hardware setup for a typical show, as well as tools in Visibox for making sure your image appears at the proper scale and orientation when projected on a screen or some other display device.
Basic hardware setup
While it is possible to run Visibox on a single screen by fullscreening the Output window, this will hide the Controller window – so you’ll be flying blind, unable to see what song is currently selected and other information from the Controller window. A better option is to use two displays.
Two-display setup
The most common way of using Visibox will be on laptop computer connected to a video projector. Visibox has been optimized so that you should be able to run it on just about any compatible Mac or Windows laptop connected to just about any video projector. You will probably find that a faster computer with a solid-state drive will load and play high-resolution media content better. Likewise, you will probably want a bright (3000+ lumen) video projector with 720P resolution or better. There are myriad different connectors on different computers and video projectors, but chances are good that with the right set of dongles and adapters, you can get from one to another.
More than two displays
There are countless ways to set up Visibox. If you would like to more than one display (projector, TV, LCD, etc.) showing to your audience, you’ll want to decide whether you want the audience-facing displays to show the same thing or different things.
If you want to show the same content on multiple screens, you can use a simple HDMI splitter (about USD $20) to split the signal. This can also be done by attaching each display directly to multiple video outputs on the computer and using the computer‘s settings to mirror the displays. However, this will use up more of your computer’s graphics resources, and may be less performant the the video splitter option.
If you would like to show different content on each screen, then your best bet is to use a video wall controller. This device takes a single video input and spreads the image across multiple outputs. They are available in a variety of configurations, from 2x2 to 4x4 and beyond. They are also available at a variety of price points, depending on the resolution and features you need. We‘ve had good luck with a USD $150 2x2 video wall controller from Amazon. Most inexpensive video wall controllers will only support a single input resolution, and they will stretch this across whatever number of outputs you have. So, for instance, if you have 2 horizontal 16:9 video projectors on either side of the stage, the image spread across them will be squashed down and stretched out to fit the 32:9 aspect ratio of the combined display. But Visibox offers functionality to fix this. See the “Video Wall Stretch” section below.
Using a video wall controller, you can accommodate a wide number of screens. So you could have 3 vertical output screens, spread across the stage; 4 screens aligned horizontally; or 2 screens stacked. You’d configure the video controller for 3x1, 1x4, or 2x1 respectively. Then within Visibox, you would select the appropriate number of columns and rows in the Project > Video Wall Stretch submenu. You may also need to rotate the output to the video wall controller, either through system settings, or through Visibox‘s Project > Rotate submenu.
Common laptop video output formats:
- USB-C (or Thunderbolt 3)
- HDMI
- VGA
- DVI
- Display Port or Mini Display Port
- Thunderbolt 1 or 2
Common video projector input formats:
- HDMI
- VGA
- DVI
You can pretty easily find adapters between HDMI and any of these connectors. So you can usually use HDMI as your common denominator. For example: let’s say you have a new MacBook Air with USB-C connectors and an older video projector that only has a VGA connector. You could pick up a USB-C to HDMI adapter, a long HDMI cable, and an HDMI-to-VGA adapter and you’re good to go! Not all adapters are created equally though, so try out a few options if your first try doesn’t work.
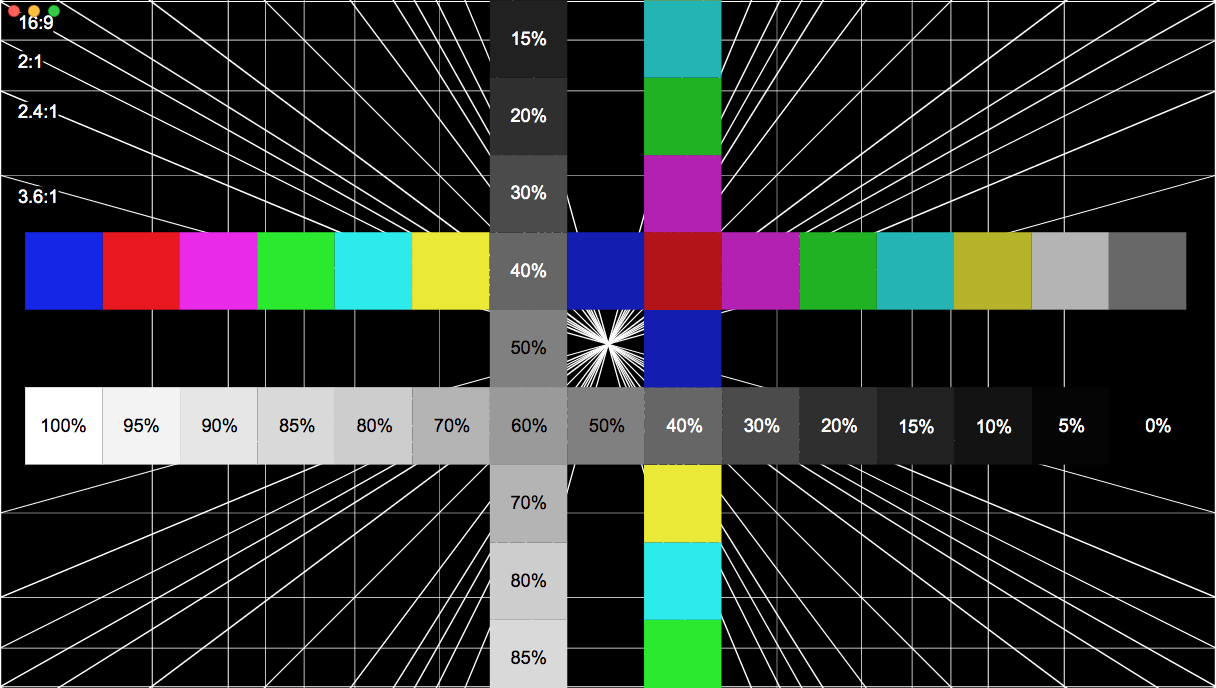
Using the “Calibration and Focus” screen
In a typical performance situation, you may have only minutes to set up, focus, and calibrate a video projector. The Window > Calibrate And Focus (⌘K) function projects an image with fine lines for easy focusing, bright colors for color calibration, and grayscale values to calibrate contrast. Various aspect ratios are indicated to help you determine the aspect ratio of the projector or display device.
Dealing with projector variations
Part of setting up your Project is to make sure it is suited to the projector or other display screen that it will appear on. Visibox provides a number of controls for making sure your videos display as you intend, regardless of the projector. You will see the results of your settings in the Output Window.
If you bring your own projector, you can set this up ahead of time, but Visibox makes it quick and easy to adapt your Project’s output to a borrowed display just before the show.
Rotate
Some projectors are suspended upside-down from the ceiling, in which case, you can rotate the Project 180 degrees (Project > Rotate) so the image appears the right way up.
You can also use the Rotate function to show your video content vertically (rotated 90°). Vertical banner-like screens have the advantage of a smaller footprint on the stage.
Your projector and/or the Mac and Windows system settings may also offer a rotate option in a more elegant way.
Flip
If the venue uses rear-screen projection, use the Flip function (Project > Flip) to flip the image horizontally so the picture is not reversed. You can also flip the output vertically.
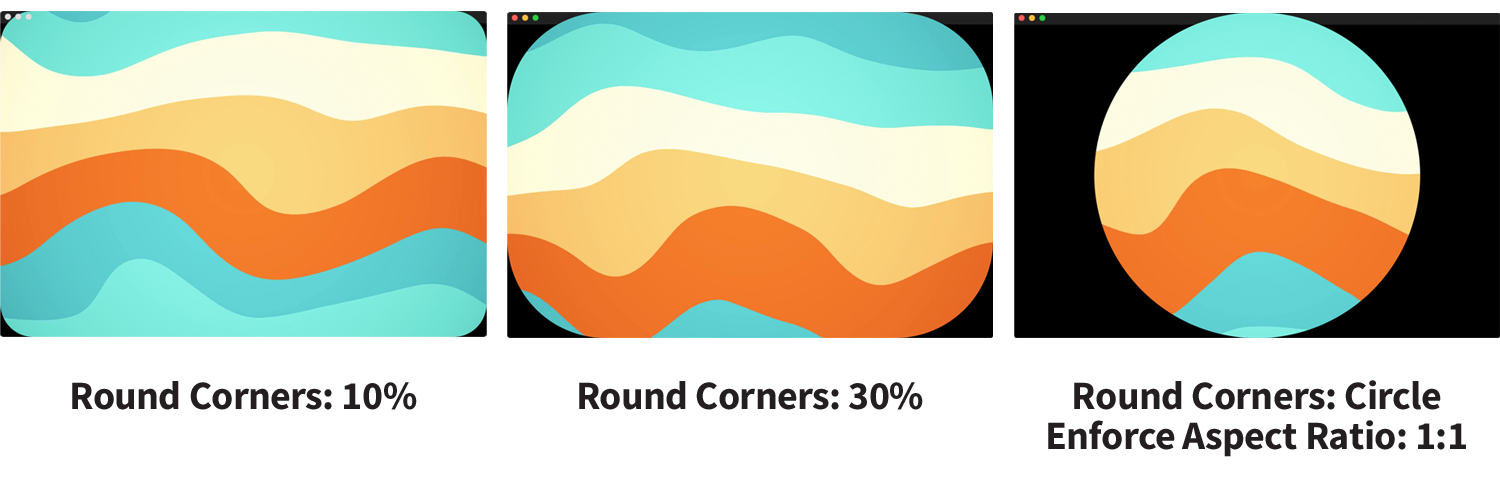
Rounded Corners
Visibox allows you to put rounded corners on your Clips using the Project > Round Corners menu. You can choose roundness from 10% to 50%.
Round displays!
When you combine 50% rounded corners with an enforced 1:1 (square) aspect ratio, you get a circular display area. Pretty neat!
Preserving aspect ratio
The “aspect ratio” is the ratio of the width to the height of an image or screen. Some common media aspect ratios are 16:9 (referred to as HD or widescreen) and 4:3 (referred to as SD). Your videos have an inherent aspect ratio. Display devices (projectors, televisions, and other screens) also have their own aspect ratios.
When you set the Output window to Full Screen as you would for a performance (Window > Full Screen), it resizes to match the aspect ratio of the display device and resizes the video in it too. Because you may not know the aspect ratio of the video projector you will be using, you can select “Project > Enforce Aspect Ratio” to ensure consistent output.
Video Wall Stretch
If you are using a video wall controller to span your content across multiple displays, you can use the Video Wall Stretch setting to compensate for the stretching that most video wall controllers apply to fit the combined aspect ratio of all displays.
In the Project > Video Wall Stretch submenu, select the arrangement that matches your display setup. For example, if you have 2 projectors side by side, choose “1 row x 2 cols”. For 4 televisions stacked vertically, choose “4 rows x 1 col”.
This setting ensures your content displays correctly across multiple screens without distortion.
Resolution
The “resolution” of a video is the number of pixels that make up the width and height of the image. Displays also have resolutions, for example, the image on a typical 720p projector is 1280 pixels wide by 720 pixels high.
Be aware that if you use a low-resolution video in a Project displayed at a higher resolution, the video will be resized larger and may look blurry or pixelated. If you use a video with a much higher resolution, it will look great, but may not play back smoothly. So if you have a choice, pick a resolution that is in the same ballpark as the device you will be displaying it on.
Soundcheck checklist
- Ensure that the laptop is plugged into AC power. You don’t want to run out of battery power halfway through a show.
- Ensure that the laptop is connected to the projector
- Run Calibration and Focus (⌘K) and make sure the projector is aligned and focused
- If you are triggering Visibox with a MIDI device, ensure that it is sending/receiving MIDI. Trigger a few Clips. If it has indicator lights, ensure that these are lighting properly.
- If your project uses sound, run an audible video Clip or song with attached audio. Make sure sound is getting to the soundboard and monitors.