Project Menu
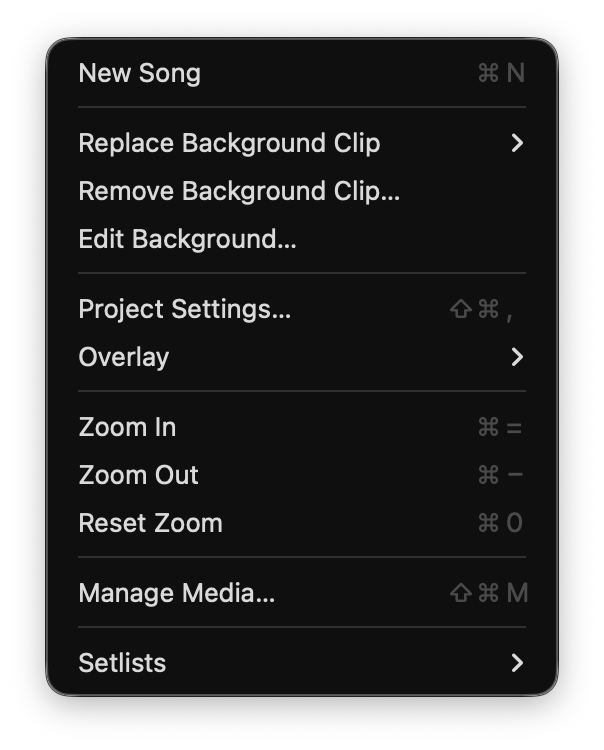
The Project menu holds the things that belong to the Project as a whole: adding Songs, setting the background, choosing a running order, and opening the windows that edit the Project’s own settings.
The controls that decide how the output looks are no longer here. Rotation, flip, enforced aspect ratio, rounded corners and video wall compensation are all in the Settings window now, because they describe the room rather than the Project. See Output Settings and Canvas Settings.
Adds a new Song to the Project. You will get used to ⌘N, but the menu item is here when that is not an option.
Pastes Songs you have cut or copied into this Project. The row only appears when Visibox is holding Songs on the clipboard, and it names the number it will paste, so a three-Song copy reads “Paste 3 Songs”.
Paste Songs into a different Project from the one you copied them from.
By default the Output shows black when nothing is playing. A Background Clip fills that space instead.
The Background Clip can be any kind of Clip, not only a video:
| Submenu item | What it adds |
|---|---|
| Image or Video… | Opens a file picker for an image or video file. |
| Camera | Lists your connected cameras and video inputs. Pick one to make it the background. |
| Visualizer | Lists your visualizer presets. Pick one to have the background react to audio. |
| Color | Lists the color presets. Pick one to make it the background. |
Once a Background Clip is set, this row reads Replace Background Clip and swaps it for a new one.
You can also drag an image or video file from the desktop onto the Output window, or click the Background thumbnail in the Control Bar to add, replace or edit it during a show.
A Background Clip belongs to the whole Project. Songs cannot each have their own.
Takes the Background Clip out of the Project. The Output shows black again when nothing is playing.
Opens the Background Clip’s own editor panel: fit mode, rotation, flip, Filters, Effects, trim, speed, and the rest. It is the same set of options any other Clip gets, in the same panel, rather than the nested submenu this used to be.
Opens the Project Settings window, which holds the Project title, Uppercase Titles, Default Fit Mode and the Control Bus.
Assigns an Overlay to the whole Project, so it appears over every Song and every Clip that does not override it.
The submenu lists Inherit, None, and your Overlay library. Overlays stack, so several can be checked at once. See Overlays.
Makes the Controller window’s content larger.
Makes the Controller window’s content smaller.
Returns the Controller window to 100%.
Opens the Media Management window, where you can see every media file in the Project, optimize them, and manage their thumbnails.
A Setlist is a saved running order of the Songs in a Project. One Project can hold several, so the same material can be played in a different order at a different venue.
The submenu lists every Setlist in the Project, with the active one marked. Choose one to switch the Controller to that order. Below the list:
- Save Current Order as New Setlist saves the running order you are looking at now as a new Setlist.
- Manage Setlists… opens the Setlists window, where Setlists are renamed, reordered, and deleted.