Song Menu
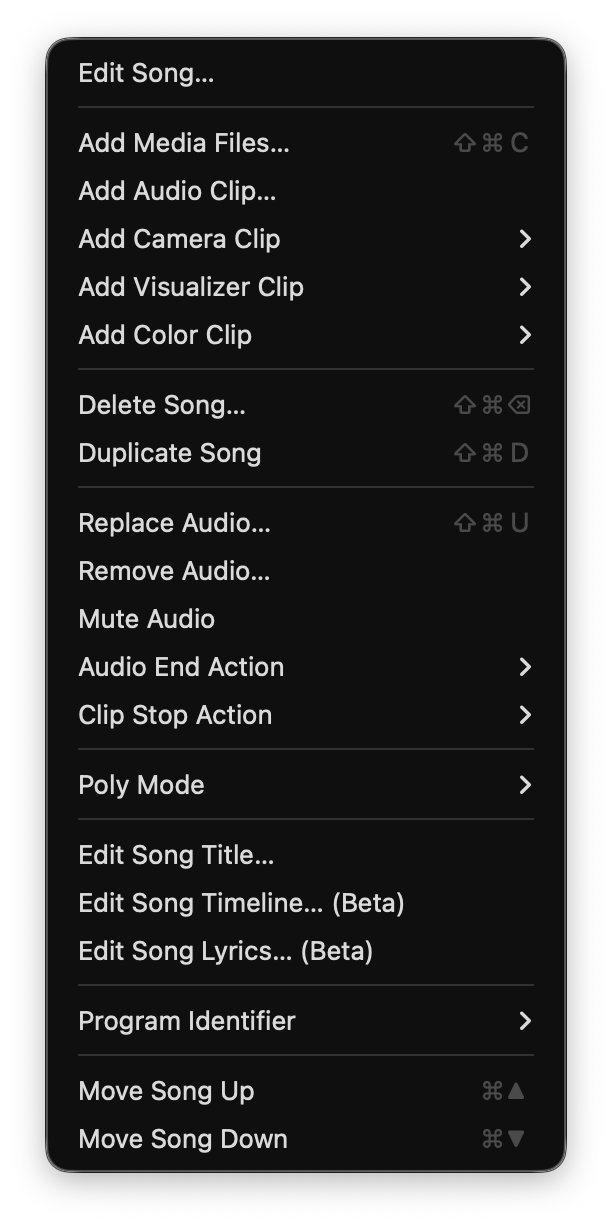
The Song menu acts on whichever Songs are selected in the Controller window. Its title follows the selection, so it reads “Song” for one and “Songs” for several.
The menu carries the Song actions, the settings that fit a list of choices, and Edit Song…, which opens the Song Editor Panel. The two routes set the same values. What the panel adds is what a menu cannot draw: the audio volume slider, the Overlay picker, and the freeform color picker behind Add Color Clip.
New Songs come from Project > New Song or ⌘N.
Open the Song Editor Panel for the selected Songs. Right-clicking a Song does the same thing.
It leads the menu because it is the way to every control the rest of the menu cannot draw.
Adding Clips
These rows add a Clip to the Song. They appear when a single Song is selected.
Pick one or more media files (video or image) to add to the Song. Same result as dragging files from the desktop onto the Song. The picker takes audio files too, and picking a single one asks whether to attach it to the Song or make it a Clip.
Pick one or more audio files and add each as its own Clip. Unlike a drop, this never asks: it always makes Clips. See Audio Clips.
Lists the cameras and capture devices attached to this computer. Pick one and the Song gets a Clip showing its live picture. See Cameras.
If nothing is connected, the submenu holds a single No Cameras Found row.
Lists the Visualizers in the Project. Pick one and the Song gets a Clip that draws it live from the audio. See Visualizers.
If the Project has none, the submenu holds a single No Visualizers Found row.
Lists the named colors. Pick one and the Song gets a solid-color Clip. For a color that is not on the list, use the picker in the Song Editor Panel.
Delete the selected Songs and every Clip in them. With several selected the row counts them: Delete 3 Songs….
Copy the selected Songs, with their Clips and settings. Duplicates point at the same media files as the originals, so a copy costs almost no disk space.
You can also hold ⌥ and drag a Song by its handle to duplicate it where you drop it.
Attach an audio file to the Song as a backing track that plays while the Song’s Clips play. Once a Song has audio, this row reads Replace Audio….
Audio files can be:
- Mpeg-3 (mp3)
- Advanced Audio Codec (aac)
- Mpeg-4 audio (m4a)
- WAV (wav)
- FLAC (flac)
- Ogg (oga)
- OPUS (opus)
Mute Audio, Audio End Action and Clip Stop Action are the three rows below. Volume is in the Song Editor Panel, because a menu cannot draw a slider.
Take the backing track off the Song. Available only when the Song has one.
Silence the backing track without removing it. A checkbox, not a list. Available only when the Song has audio.
What happens when the backing track finishes: Stop Clips, Clips Keep Playing, Loop Audio, Cue Next Song, or Start Next Song. Available only when the Song has audio. See Audio End Action.
What happens to the backing track when the last playing Clip stops: Stop Audio or Audio Keeps Playing. Available only when the Song has audio. See Clip Stop Action.
How this Song puts more than one Clip on screen at once: Mono, the default, plus Blend, Mosaic, Horizontal Stripes, Vertical Stripes, Stack, and Spots. See Poly Mode.
Put the Song title into edit mode. Double-clicking the title in the Controller window does the same. Available for a single Song.
Open the Timeline Editor for the Song, where you write a timed cue list that fires triggers, playback changes, and MIDI as the Song runs. Available for a single Song.
Turn on Settings > General > Enable Beta Features to see this.
Open the same window on its Lyrics tab, where you write the Song’s chords and lyrics. Available for a single Song.
Turn on Settings > General > Enable Beta Features to see this.
Give the Song a MIDI program number, so a program change message selects it. The list runs from None through 1 to 128, or 0 to 127 with Program Change numbers start at 0 turned on in Settings > MIDI. A number another Song already holds is listed beside that Song’s title, anywhere in the Project: a Song outside the active Setlist reads “(not in setlist)”. Picking a number that is taken swaps the two Songs’ numbers rather than creating a duplicate. Available for a single Song.
See Selecting Songs via MIDI Program Change.
Move the selected Songs through the running order. Dragging a Song frame by its handle does the same. The running order belongs to the active Setlist. See Setlists.