Song Menu
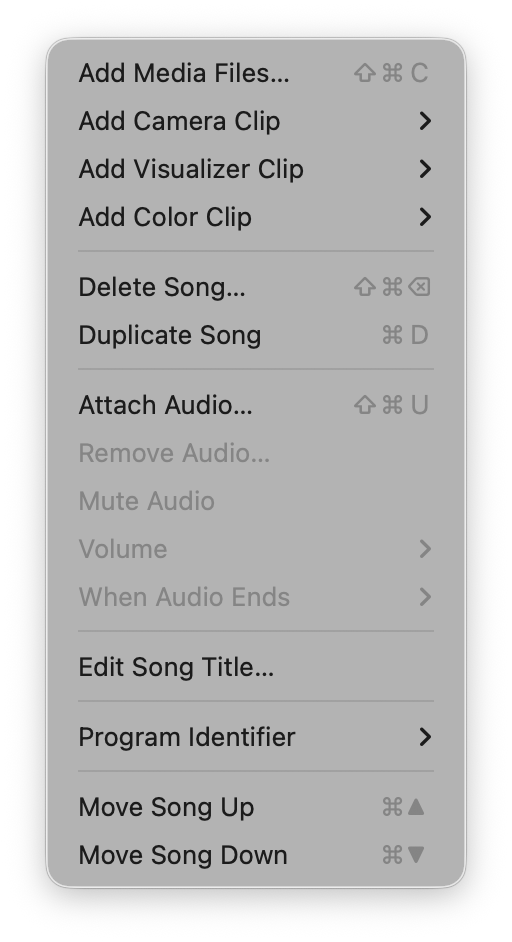
The Song menu holds functions related to adding Clips and background audio to individual Songs in the Project. There are also menu items for renaming, moving, and deleting individual Songs, although it will likely be easier to do these tasks in the interface itself (i.e., dragging a Song frame to move it or double-clicking a Song title to edit it) or by using keyboard shortcuts.
Songs are added to the Project using the Project > New Song menu or the ⌘N keyboard shortcut.
Right-click a Song to open the Song Editor Panel, which offers the same options with richer controls including visual sliders for volume adjustment.
This prompts you to select one or multiple media files (video, image, or audio file) to add them to the Song. This is similar to dragging files from the desktop into a Song.
You can add a live video feed to a Song as if it were a video clip. This works with any internal or external USB camera, as well as HDMI video inputs connected via a capture adapter. See Connecting Cameras & Video Inputs for details.
Add a Visualizer Clip to the Song — a live, generative, audio-reactive visual that renders in real-time. Choose from built-in MilkDrop or ISF (shader) presets, or use one you have created in the Visualizers Editor. See the Visualizers page for full details.
Add a solid-color Clip to the Song from a list of 12 preset colors. Color Clips are useful when a Song has an attached audio track but no visual Clips, since Visibox must be playing a Clip in order to play Song audio. A black Color Clip gives you a clean way to play “nothing” visually. You can also apply Effects to Color Clips for textured, animated visuals from a simple solid color.
Need a specific color? After adding a Color Clip, right-click it to open the Clip Editor Panel where you can enter exact hex values or use the system color picker.
These are the controls for adding, removing, and adjusting a background audio track on the Song. This “backing track” audio plays while the sequence of Clips is playing. You can also specify what happens when the audio track ends (stop the current Clip from playing, let the current Clip keep playing, loop the audio, cue the next Song, or start the next Song). For continuous volume adjustment with precise text input, use the Song Editor Panel. Audio files can be:
- Mpeg-3 (mp3)
- Advanced Audio Codec (aac)
- Mpeg-4 audio (m4a)
- WAV (wav)
- FLAC (flac)
- Ogg (oga)
- OPUS (opus)
This makes a copy of the selected Song. Note that this references the same media file as the original, optimizing space on your hard drive.
This deletes the current active Song and all of its Clips.
Put the active Song’s title into edit mode. You can also double-click the Song title to edit it.
This allows you to set a unique identifier for the Song, which can be used to trigger it from external software or hardware. This is useful for advanced setups where you want to control Visibox from another application or device. See the “Selecting Songs Via MIDI Program Change” section for more information.
These two menu items move the active Song up or down in the Project. You can also drag the Song frame to move it.