Audio in Visibox
Audio Outputs
Every connected audio interface shows up under Settings > Audio > Output Device. The first item in that list follows the output you have chosen in your system settings, so Visibox works out of the box with your computer’s built-in output.
If you have a better interface for the show, point Visibox at it and leave your system output on the built-in speakers. Alerts and notification sounds then stay on your laptop instead of going out to the audience.
The full control reference is on Audio Settings.
Mute
Visibox has a true mute control that silences all audio output while preserving your volume setting. When you mute, the volume slider stays in position, so you can see exactly where it will return to when you unmute. Moving the volume slider while muted unmutes.
You can toggle mute from the Control Bar, from Settings > Audio, or with a keyboard shortcut. Turn on Remember mute state in Settings > Audio if you want Visibox to start in the state you left it.
Multichannel Audio
Most built-in outputs are stereo, but Visibox also plays across multichannel interfaces.
On the Mac, Visibox sees every output your interface offers, with no extra setup.
On Windows there are two paths. The default path goes through the Windows audio system and reaches up to 8 outputs, after you configure the interface in Windows Sound. The ASIO path talks to your interface’s own driver and reaches the channel count the interface actually has. Both are described below.
Most multichannel interfaces ship with configuration software that sets the output routing. You might route your interface’s ADAT outputs as channels 1 to 8, for example. Visibox follows that routing and spans your multichannel audio across the outputs starting at channel 1.
Channel assignment comes from the source file itself. Visibox sends the file’s first channel to output 1, its second to output 2, and so on. There is no per-clip routing control, so the order of the channels in the file is the order they reach your interface.
Configuration on Mac
Visibox detects connected multichannel interfaces on its own. Open Settings > Audio, choose your interface under Output Device, and all of its outputs are available.
Configuration on Windows
Once the interface is connected and its drivers are installed, configure it in the Windows Sound settings:
- Open Settings, then go to System > Sound > More Sound Settings.
- Select your audio interface and click the Configure button.
- In the window that opens, choose 7.1 Surround Sound to use all 8 outputs.
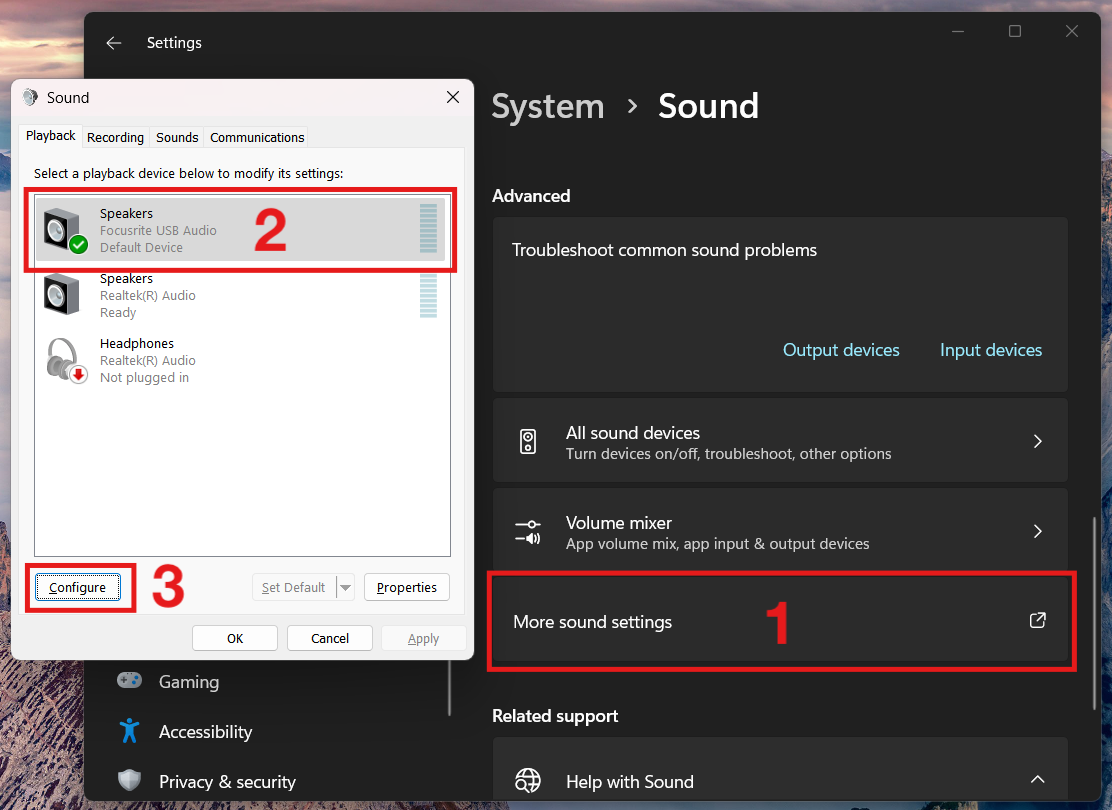
Open the Sound panel. Then click “More sound settings” to open the window. Select your multichannel audio interface. Then click the “Configure” button to set it up for multichannel output.
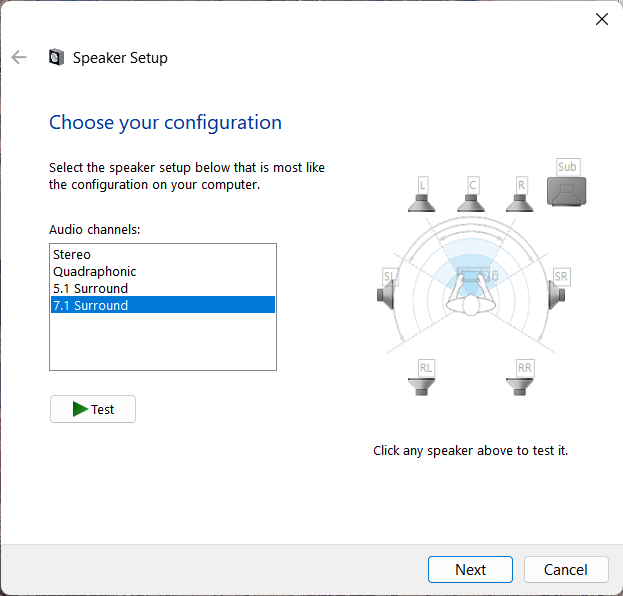
In the popup window, select “7.1 Surround” to enable all 8 outputs.
If your interface is connected and you do not see it listed, or you do not see a 7.1 Surround option, check the following:
- You have the latest drivers and system updates.
- Everything installed correctly.
- The interface is set up for multichannel output in its own configuration software.
ASIO Output on Windows
Windows Sound tops out at 8 channels, which is short of what a 16 output interface can do. Visibox can drive those interfaces through ASIO instead, talking to the interface’s own driver and using its full channel count. There’s no Windows Sound configuration to do. Turn on Settings > General > Enable Beta Features to see this.
Pick an ASIO device from the Control Bar. Click the output level meter at the right of the Control Bar to open the menu. It lists every output device Visibox can use, with your ASIO interfaces added below the operating system’s own devices. Each ASIO entry names the interface and its channel count, and reads “ASIO - Your Interface - 16ch (Beta)”. ASIO interfaces do not appear in the Output Device list in Settings > Audio.
How many channels Visibox sends depends on the Channels setting:
- Multitrack sends discrete channels spread across the width of the interface.
- Stereo and Mono fold everything down to two channels or one, the same as they do on any other device.
Choosing an ASIO device silences the computer’s own output, so only the interface plays. Choose another device, or unplug the interface, and the computer’s output comes back.
Clip & Song Audio Metering
Visibox displays real-time audio level meters on individual Clips and Songs in the Controller window. A green vertical bar appears on the left edge of any Clip or Song that is currently producing audio. That makes it easy to see at a glance where your audio is coming from. It might be a video Clip with embedded audio, an audio Clip, or a backing track attached at the Song level.
The meters respond instantly to audio peaks and fade smoothly as levels drop. If the audio level clips, the meter turns red to warn you that distortion may be occurring. Muted Clips and Songs do not display a meter.


During a performance, the Clip and Song meters are a quick way to diagnose audio issues. If you hear unexpected audio, glance at the Controller and the meters will show you exactly which Clip or Song is producing sound.
System Audio Input
Visibox can capture audio from other applications running on your computer and use it as input for Visualizers and audio-reactive Effects. Visualizers and Effects like Bass Pulse, Audio Shake, Spectrum Bars, and Disco Audio Flash can then react to music playing in Spotify, a web browser, a DAW, or any other app producing sound. They react to audio inside Visibox too.
Turn it on in Settings > Audio > Enable System Audio Input.
On macOS this needs a system permission. On macOS 14.2 and later, the system asks you for System Audio Recording permission the first time Visibox captures, and no restart is needed. On earlier versions, grant Visibox Screen & System Audio Recording under System Settings > Privacy & Security, then restart Visibox.
Downmixing
Visibox offers three modes for audio output: Stereo, Mono, and Multichannel. Choose one in Settings > Audio > Channels, where the third mode is labeled Multitrack. You can also click the audio mode mark next to the output meter in the Control Bar at the top of the Controller window.
The modes work as follows:
- Mono: Audio plays in dual mono, with the same signal sent to channels 1 and 2. Stereo source audio is downmixed to mono, and multichannel source audio is downmixed to mono with all channels mixed together.
- Stereo: Audio is output in stereo, using channels 1 and 2 of your interface. Mono source audio plays equally in both channels. Multichannel source audio is downmixed to stereo with odd channels on the left and even channels on the right.
- Multichannel: Audio is output in its original multichannel format, with each channel sent to its corresponding output. Nothing is downmixed. Mono files play in dual mono on channels 1 and 2. Stereo files play in stereo on channels 1 and 2. Multichannel files play across all available outputs, starting at channel 1, and any channels beyond your interface’s width are not output.
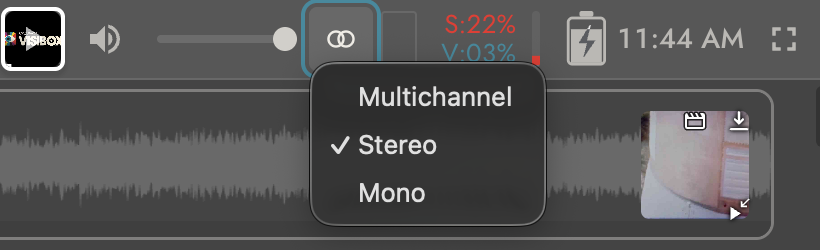
Click the mode mark next to the output meter in the Control Bar to change the audio output mode.
Multichannel Metering
When you have multichannel audio files (more than 2 channels) in your Project and Visibox is in multichannel playback mode, Visibox displays a multichannel meter in the Control Bar. The meter shows playback levels for any playing audio or video file. If your audio interface has fewer output channels than the file, the extra channels are drawn as outlined meters. A 6-channel audio file on a 4-channel interface shows channels 5 and 6 outlined.
Meter bars run green through the working range, turn amber as they approach full scale, and go red at full scale.
Bars render at their full width through 8 channels and compress from there, so a stereo mix reads clearly rather than as a pair of slivers. The meter itself is capped in width, so a high channel count leaves the clock and battery readouts where they are.

An 8 channel audio file playing on a stereo interface. Channels 3-8 are outlined because they are not being output. Note the multichannel mark next to the output meter in the Control Bar.

An 8 channel audio file playing on a 32-channel interface.
If Your Interface Disconnects Mid-Show
Audio keeps playing. If the device Visibox is using goes away, whether someone kicks a USB cable out or a dock drops off, Visibox moves the audio to another device rather than falling silent. It chooses in this order:
- Your chosen ASIO device, if it is present.
- Your chosen output device, if it is connected.
- Whatever is already playing, if it is still connected.
- The first available device.
A notification tells you what happened, naming the device that went away and the one now playing. Plug the interface back in and audio returns to it, with a second notification confirming the reconnection.
Step 3 is the one that matters on show day. Connecting an unrelated device while your interface is missing leaves the output where it is, so the sound stays put instead of jumping to whatever was plugged in last.
Combining Stem Files
Visibox combines multiple audio files into a single multichannel file for you, up to 31 channels. In addition to playing multiple Clips per Song, you can attach a single audio file to each Song: mono, stereo, or multichannel, such as WAV, AAC, MP3, or FLAC.
Outputting a multichannel file from a DAW (Logic, Pro Tools, and the like) is far from straightforward. Most of these tools are built for “surround” audio, and that workflow gets in the way when what you want is one file holding several stems: drums, bass, guitar, vocals. Combine them in Visibox instead. Here’s how:
-
Output your stems from your DAW as separate audio files, uncompressed (WAV) or compressed (AAC, MP3). Four stereo stems, say a drummer’s click, a band click, keyboards, and backing vocals, combine into one 8-channel file.
-
Name the files so they sort alphabetically in the order you want them to play: “01 Click Track Drums”, “02 Click Track Band”, “03 Keyboards”, “04 Backing Vocals”.
-
In Visibox, create or find your Song and attach the audio files to it, all at once. You can do this by either:
a. Right-clicking on the Song and selecting Attach Audio, then selecting the multiple stem files you want to combine.
b. Dragging all of the files from your file browser directly onto the Song in the Controller window.
c. Copying the files from your file browser, then pasting them onto the Song in the Controller window. -
Visibox asks you to confirm the combination of the files. Confirm the combine and Visibox generates a new multichannel audio file that holds every stem in the order you specified. When you drag or paste the files, the dialog also offers Keep Separate, which adds each file as its own Clip instead.
The finished file attaches to the Song and plays like any other audio file. An icon with three interlocking circles () marks the Song as carrying multichannel audio.
Channel limit
31 channels is the ceiling, whether the audio sits in an audio file or in a video file. If the files you select add up to more than that, Visibox tells you the total and cancels the combine rather than making a file it cannot play. A single file that is already wider than 31 channels is turned away when you import it, for the same reason.
Combining Stem Files Into a Video File
You can also combine audio stems into a video file. This keeps a video, such as a music video with separate stems for drums, bass, and backing vocals, in one file with its audio. Follow the same steps as above, and include a video file among the files you add to the Song. Visibox recognizes the mix of audio and video and asks you to confirm the combine.
Existing Multichannel Audio and Video Files
If you already have a multichannel audio or video file that you want to use in Visibox, drag it onto the Song in the Controller window. Visibox recognizes it as a multichannel file and plays it back across all available outputs. Keep in mind that the layout of the channels in, for instance, a 5.1 surround sound file may not match the layout of your audio interface. Visibox plays the channels in the order they are defined in the file, so you may need to adjust your audio interface’s routing to match.