MIDI Settings
This is the MIDI Map: a table of everything Visibox can be told to do, and the note or knob on your controller that tells it. In Visibox 5 this was a separate window. It is now a category in Settings, and the MIDI Map… menu item opens it here.
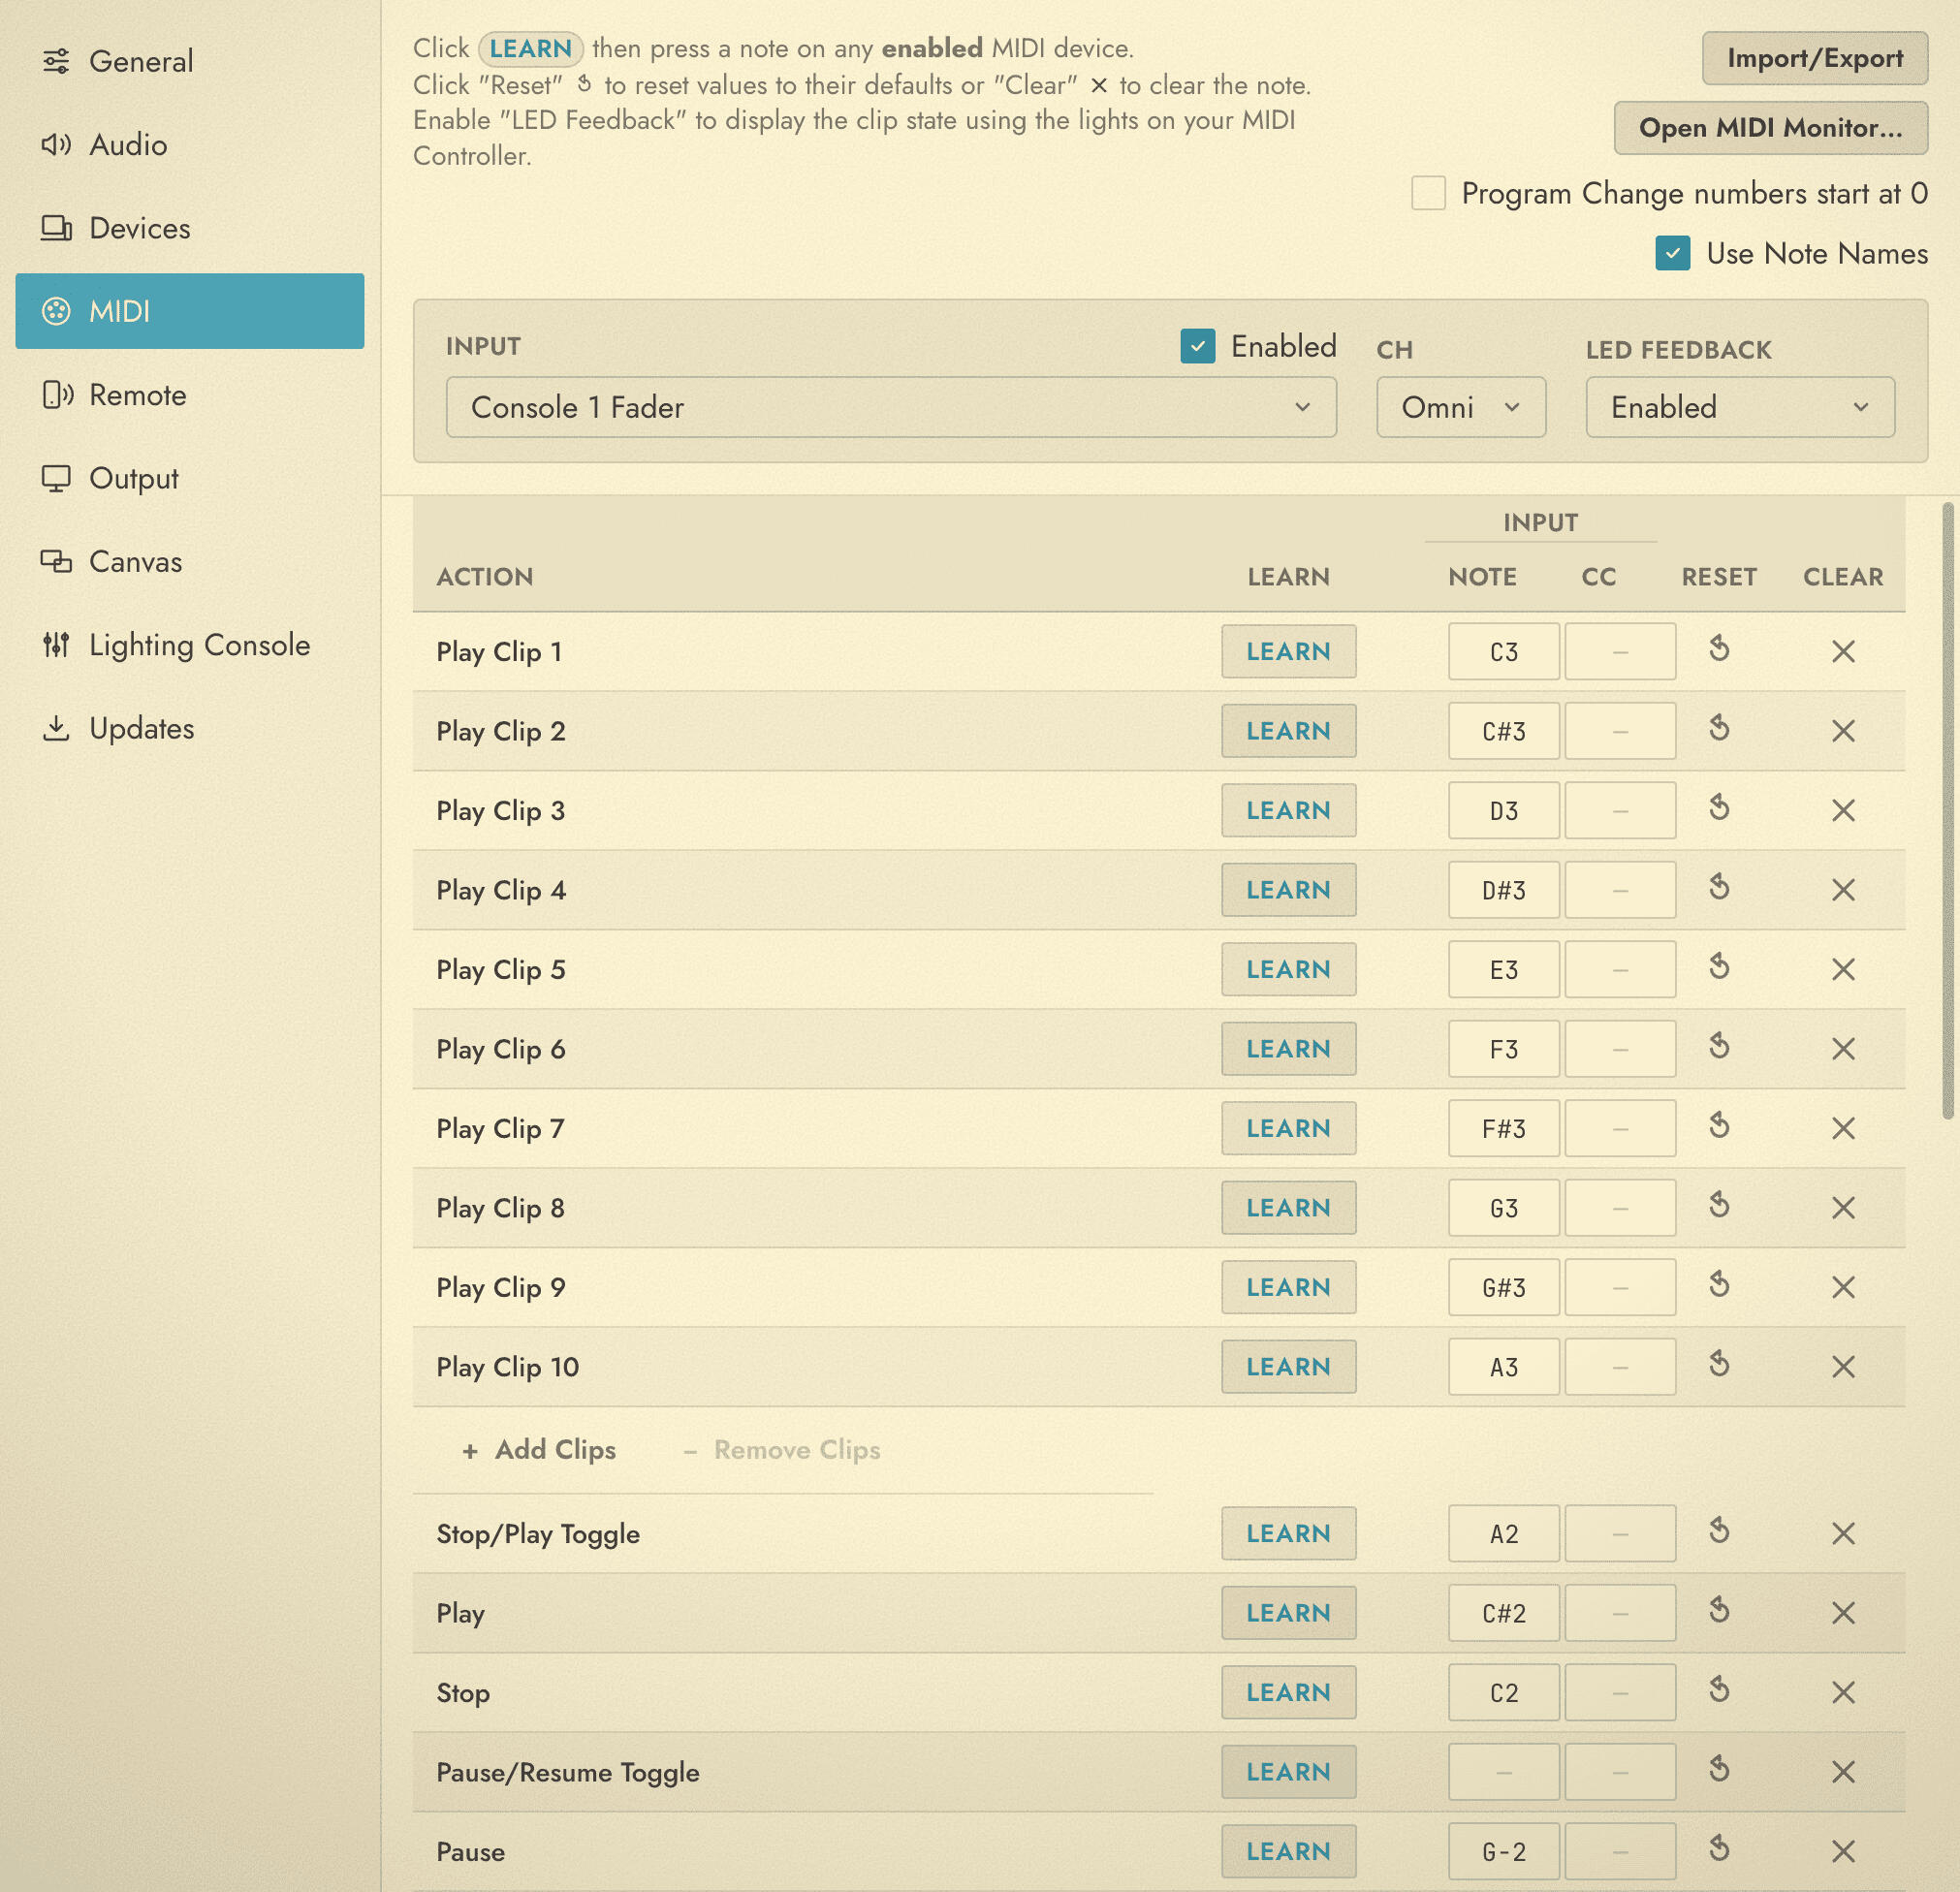
Maps are stored on your computer, not in the Project, so a map you build once follows you from show to show.
Choosing a device
The bar above the table decides which controller you are working on, and whether Visibox is listening to it.
| Control | What it does |
|---|---|
| Input | The device this map belongs to. Every device gets its own map. Default is the fallback map, used for any device that has no map of its own. |
| Enabled | Beside Input. Checked, Visibox listens to this device. A device you uncheck stays in the list marked (off), so you can map a controller before you turn it on. The Default map has no checkbox. |
| Ch | The MIDI channel to listen on, 1 through 16, or Omni for all of them. |
| LED Feedback | Enabled or Disabled. When enabled, Visibox lights the pads on this controller to show what is playing. See MIDI Feedback. |
New devices arrive enabled, so a controller you plug in works without a visit here. See Using MIDI for when you would turn one off.
Unplug the device you are editing and Visibox falls back to the Default map so you are never editing something that is not there.
Open MIDI Monitor…, at the top of the category, opens the MIDI Monitor window, which shows the raw messages arriving from your controller.
Use Note Names at the top of the table switches the Note column between numbers (0 to 127) and note names such as C4 or D#5. It changes the display only, not the mapping.
Program Change numbers start at 0, beside it, switches how Visibox numbers a Song’s Program Identifier: 1 to 128 when it is off, 0 to 127 when it is on. Match it to whatever your controller prints on its own display. It changes the numbering you see, not which message selects which Song. See Selecting Songs via MIDI Program Change.
The table
Each row is one action, with a Note field and a CC field. Assign either, or both. The row also carries a Learn button and, at its right edge, Reset and Clear.
The rows run in this order.
| Rows | Notes |
|---|---|
| Play Clip 1 through Play Clip 10 | Trigger a Clip by its position in the Song. |
| Add Clips / Remove Clips | Buttons, not actions. Add Clips appends five more Play Clip rows for Songs with more than ten Clips; Remove Clips takes them back. |
| Stop/Play Toggle, Play, Stop, Pause/Resume Toggle, Pause, Resume | Transport. |
| Previous Song, Next Song, Previous Song - No Stop, Next Song - No Stop | Song navigation. The No Stop pair moves on without stopping what is playing. |
| Previous Clip, Next Clip, Previous Clip - Unconstrained, Next Clip - Unconstrained | Clip navigation. The Unconstrained pair keeps going past the end of the current Song. |
| Output Volume | Master level. CC only, since it needs a continuous value. |
| Control A through Control H | Real-Time Control. CC only. See below. |
| Song Select | Scrubs the whole Song list with one knob. CC only. |
| Select Song via Program Change | A dropdown, not a note or CC. See Selecting Songs via MIDI Program Change. |
A note or CC number can only drive one action at a time. Assign one that is already in use and Visibox clears it from the row that had it, so you never end up with two actions fighting over the same pad.
Learn
Typing note numbers works, but pressing the pad is faster.
- Click Learn on the row you want to map. The row highlights and reads “Listening…”.
- Press the pad, or turn the knob, on your controller.
- Visibox fills in the number.
- After a note, Learn moves down to the next row on its own, so you can walk a whole grid of pads in one pass. After a CC it stops, since knobs are usually mapped one at a time.
While a row is armed, the keyboard helps:
- ↑ and ↓ move to the previous or next row.
- Backspace or Delete clears the current row.
- ⎋ stops learning.
Two things Learn deliberately ignores. CC numbers 120 to 127 are channel-mode messages, which a DAW fires off by itself when the transport starts, so Learn stays armed and waits for a real knob. And leaving the MIDI category, or putting the Settings window away, disarms the row: a hidden window listening for MIDI would otherwise swallow notes you meant for the show.
Assigning a Control
Controls A through H are the named Real-Time Control slots you point at a Clip or Effect parameter. Binding one to a knob is the same procedure as any other row, with one difference: Control rows take CC only, because a Control needs a value to sweep, not a press.
- Scroll to the Control A row, or whichever letter you want.
- Click its Learn button.
- Turn the knob or move the fader you want to own that Control.
- The CC number appears in the row, and Learn stops.
That is the whole binding. Which parameter the Control actually moves is decided in the Project Settings window, on its Control Bus tab.
Reset, Clear, and starting over
Reset puts one row back to its default assignment. Clear empties it.
What “default” means depends on which map you have open. Editing a device’s own map, Reset pulls the value from your Default map. Editing the Default map itself, Reset pulls from the assignments Visibox ships with.
At the bottom of the table, under Global actions, Reset all and Clear all do the same thing to every row at once.
Import and Export
The Import/Export button at the top saves the current map to a .vsbmm file, or loads one back in. Use it to back a map up before a big edit, to move a controller’s map to another machine, or to hand a working map to someone with the same controller.