Clip Editor Panel
Right-click any Clip thumbnail in the Controller to open the Clip Editor Panel, a floating panel holding every setting a Clip has. Clip > Edit Clip… opens the same panel.
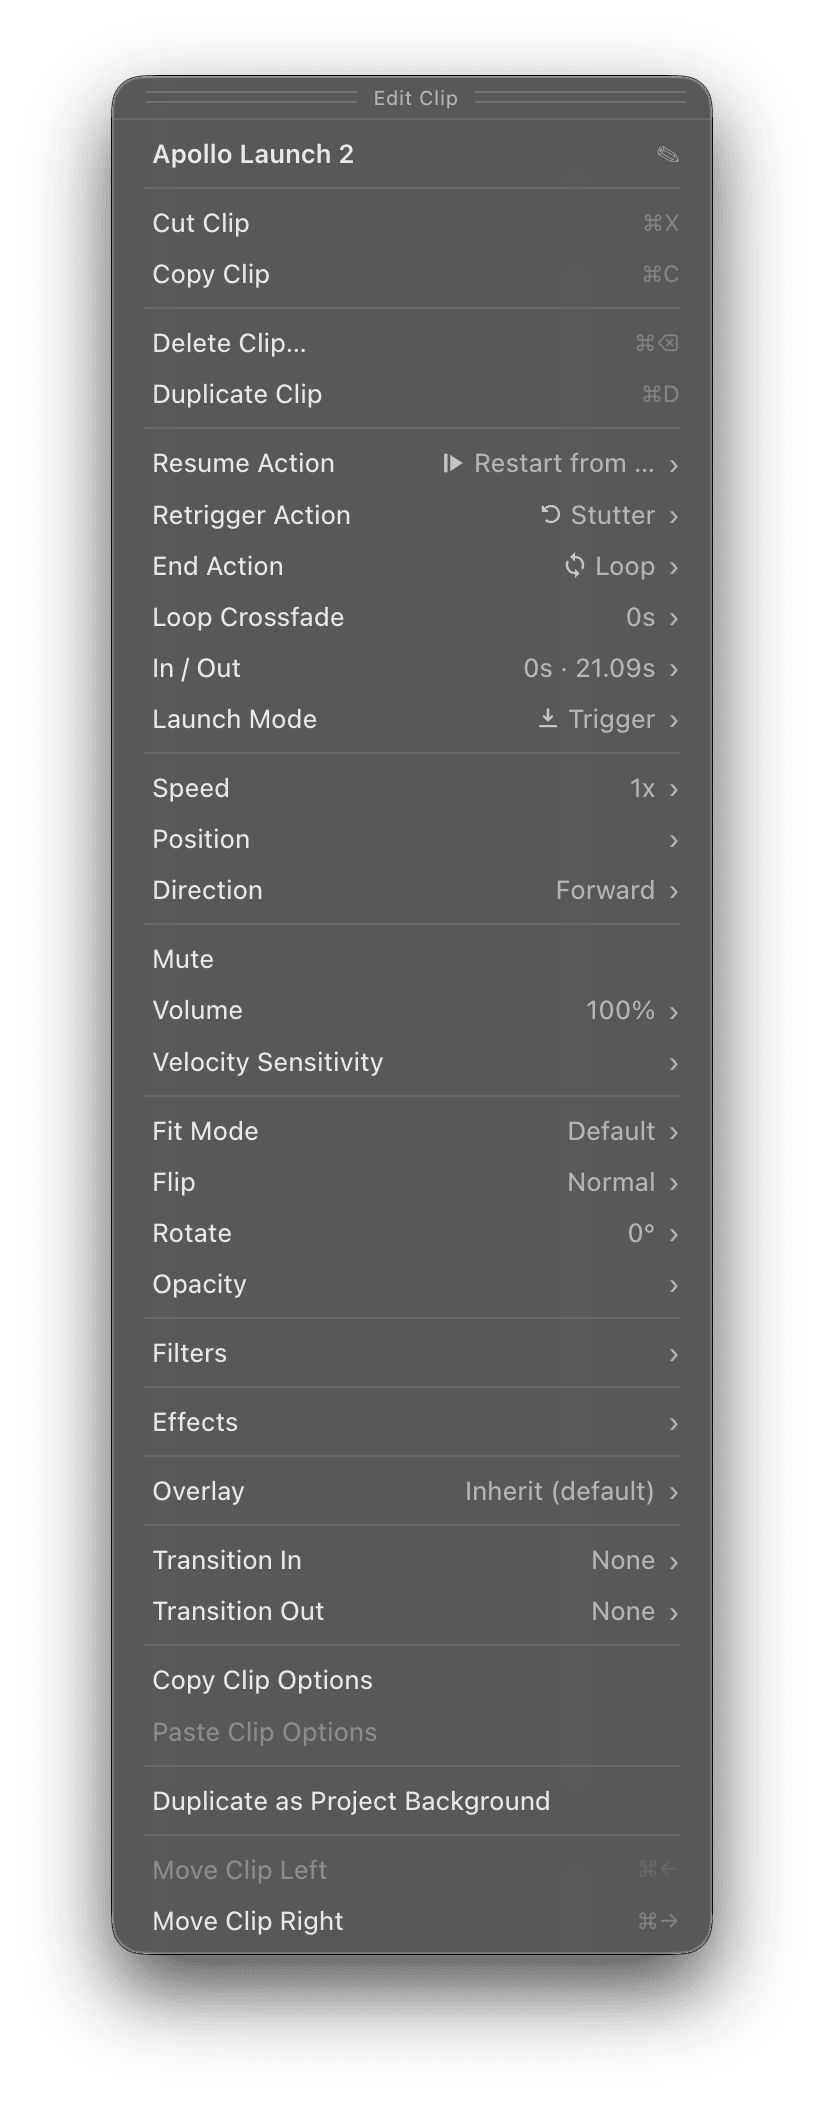
Which rows appear depends on the kind of Clip you right-clicked. A Video Clip gets the playback and audio rows, a Visualizer Clip gets rendering rows, a Color Clip gets a color picker. A row that makes no sense for the kind of Clip is left out. A row that another setting is currently blocking stays in place, grayed, showing the value in effect.
Select several Clips first and the panel edits everything they have in common. Where the selected Clips disagree on a value, the row reads Mixed until you set it.
| Section | Video | Audio | Image | Camera | Visualizer | Color |
|---|---|---|---|---|---|---|
| Playback | Yes | Yes | Yes | Yes | Yes | Yes |
| Audio | Yes | Yes | Yes | |||
| Display | Yes | Yes | Yes | Yes | Yes | Yes |
| Filters | Yes | Yes | Yes | Yes | Yes | Yes |
| Effects | Yes | Yes | Yes | Yes | Yes | Yes |
| Audio Source | Yes | Yes | ||||
| Overlay | Yes | Yes | Yes | Yes | Yes | Yes |
| Transitions | Yes | Yes | Yes | Yes | Yes | Yes |
| Visualizer | Yes | Yes | ||||
| Camera | Yes | |||||
| Actions | Yes | Yes | Yes | Yes | Yes | Yes |
Two sections vary inside themselves. Under Playback, Video and Audio Clips get the trim rows and the resume, retrigger and end rows. Image, Camera and Visualizer Clips get a Duration instead, and until that Duration is set, their Resume Action row is left out altogether and their End Action row is grayed. Display varies too: see Display below for which Clip kinds skip Fit Mode, Flip or Rotate.
An Audio Clip follows whichever it currently resembles. On its own it is a color, so it gets the color picker and none of Fit Mode, Flip or Rotate. Pair it with a Visualizer and there is a picture to place, so all three appear. It also loses the rows that lean on video-only machinery:
- Direction is gone entirely.
- End Action has no Bounce.
- Retrigger Action has no Reverse or Scratch.
- Resume Action has no Sync to Song Position.
- Loop Crossfade is gone.
See Audio Clips.
Audio Source follows its own availability rule, covered in Audio Source below.
Renaming and clipboard
The top row of the panel is the Clip’s name. Click it and type to rename the Clip. It appears only when a single Clip is selected, since a group of Clips has no one name to edit.
Cut or copy the selected Clips. A cut Clip stays in place, outlined and dimmed, until you paste it into a Song. The labels count the selection, so they read Cut 3 Clips and Copy 3 Clips. Paste with ⌘V after selecting the Song you want them in.
Playback
A Color Clip carries only Launch Mode here. It has no length, no trim and no end to reach, so nothing else in this section applies to it.
Where the Clip picks up when you return to it after playing something else.
- Restart from Beginning starts it over every time.
- Resume from Last Point continues where it stopped.
- Sync to Song Position locks the Clip to the Song’s audio timeline. See Sync to Song Position.
Sync to Song Position restricts some of the rows below. Retrigger Action, End Action and Direction each fall back to the value sync allows, and Loop Crossfade is grayed. The panel labels those rows Restricted in Sync Mode.
What a press on a Clip that is already playing does. Restart is the default. The full list and its thumbnail icons are on Clip Playback Options.
A Clip whose Launch Mode is Toggle stops on its second press instead. This row is grayed for such a Clip and shows Stop as the value in effect.
What happens when the Clip runs out: Loop, Bounce, Stop (One-Shot), Freeze, Start Next Clip, Cue Next Song or Start Next Song. See End Action.
Blends the end of a looping Clip into its start so the wrap point stops reading as a cut. Set a duration in seconds; a second or two usually does it.
The row appears only when End Action is set to Loop. It is grayed for a Clip playing backward or set to Sync to Song Position, since neither can use a crossfaded loop. Until the crossfaded version is ready, the Clip loops with a hard cut as it always did.
Pick the section of the file a Video Clip plays. The row shows both times side by side, and its panel holds an In Point field and an Out Point field. Click a value to type an exact time, down to a hundredth of a second. A point you have not set reads the natural edge of the file: the start for In Point, the end of the media for Out Point.
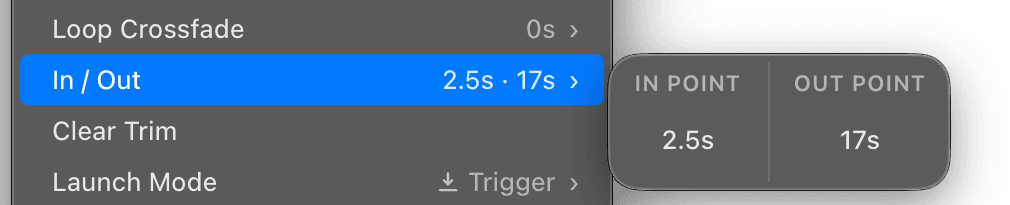
Set a trim point to wherever the Clip is right now. Both rows appear only while a single Clip is playing or paused, and both act the moment you press them.
Removes both points and returns the Clip to the full file. The row appears once the Clip has a trim to clear.
For Image, Camera and Visualizer Clips, which have no length of their own. Leave it at ∞ and the Clip plays until you move on. Give it a positive value and the Clip ends after that many seconds, at which point End Action applies.
What the trigger gesture does: Trigger starts the Clip, Gate plays it while you hold, Toggle starts it and stops it on a second press. See Launch Modes.
Leave it unset and the Clip follows its Song: Toggle in a Song with a co-play Poly Mode, Trigger in a Mono Song. The panel shows which mode is in effect either way.
Playback speed for a Video Clip, from 0.0625x to 4x, with snap points at 0.25x, 0.5x, 1x, 2x and 4x. Click the value to type an exact speed, including one past either end of the slider. Double-click the slider to return to 1x.
Video Clips only. Assigns the Clip’s playhead to one of the Project’s Controls, so a fader or knob can scrub the Clip like a record. The row carries no value of its own and appears only when there is a Control to assign it to.
Forward or Backward. A Clip playing backward is muted and cannot use a Loop Crossfade.
Audio
Video, Audio and Camera Clips. A Camera Clip gets Mute and Volume but not Velocity Sensitivity, since nobody triggers a live feed like a drum pad.
Silences the Clip’s audio track.
The Clip’s level. The slider runs from 0% to 200%, and you can click the value and type higher when a Clip is much quieter than everything around it. Double-click the slider to return to 100%.
How far a MIDI note’s velocity is allowed to move the Clip’s audio level. At 0, the default, velocity is ignored and the Clip always plays at its Volume setting. Turn it up and a harder hit plays louder.
Triggers with no velocity of their own, such as the mouse, the keyboard, a Stream Deck, OSC and the API, play the Clip at full level whatever the setting.
With Retrigger Action set to Stutter, Scratch, Reverse or Do Nothing, only the first hit sets the level. The panel captions the slider First hit only when that applies. See Velocity Sensitivity.
Display
A Color Clip gets the color picker but no Fit Mode, Flip or Rotate. Fitting, mirroring and turning a solid color would show nothing, so those rows are left out. A Visualizer Clip gets Flip and Rotate but no Fit Mode, since it renders to the frame rather than into it.
Color Clips only. Choose the Clip’s color three ways:
- Click the swatch to open your operating system’s color picker.
- Type any CSS color value: a hex code such as
#FF5500, a name such astomato, or any other CSS color format. Press Enter to apply it. - Click one of the twelve preset swatches: Black, White, Gray, Red, Orange, Gold, Yellow, Green, Sky Blue, Blue, Purple and Magenta.
The picker takes exact values, which the Clip menu preset list cannot. Use the panel when you need a specific color.
How the Clip fills the Output: Default (the Project’s setting), Crop, Letterbox or Stretch. See Fit Mode.
Mirrors the Clip: Normal, Horizontal, Vertical or Both.
Turns the Clip to any angle. The slider runs from 0 to 360 degrees and snaps at 0, 90, 180 and 270, so square turns are easy to hit and everything between them is available. Click the value to type an exact angle.
Assigns the Clip’s opacity to one of the Project’s Controls, so a fader can ride it live. It carries no value of its own and appears only when there is a Control to assign it to. Unlike Position, it is offered on every kind of Clip.
Filters
Image adjustments applied live, so the original file is untouched. Each filter has a switch and a slider:
- Turn a filter on and its slider appears.
- Drag the slider to set the amount.
- Click the value to type an exact number.
- Double-click the slider to reset that filter.
- Reset at the bottom clears all of them.
| Filter | Range | What it does |
|---|---|---|
| Blur | 0–10% | Softens the image |
| Brightness | 0–5 | Brightens or darkens |
| Contrast | 0–5 | Increases or reduces contrast |
| Grayscale | 0–1 | Desaturates toward black and white |
| Rotate Hue | 0–360° | Shifts every color around the color wheel |
| Invert | 0–1 | Inverts the colors |
| Saturate | 0–5 | Boosts or reduces color |
| Sepia | 0–1 | Applies a warm, vintage tone |
Each filter can also be assigned to a Control, so a fader can ride it during a show.
Effects
Apply visual Effects to the Clip. The panel lists the Effect library by category. Pick one to apply it, stack several to layer them, and use Reset to clear them all.
Edit Effects… at the top opens the Effects Editor, where you can browse, customize and build Effects. See Effects.
Adjusts the parameters the Clip’s Effects declare, for this Clip only. The row sits directly under Effects and appears only once an Effect on the Clip has something to tune, so there is never an empty panel behind it. The count next to the label is how many parameters you have changed.
A Visualizer Clip gets its own Tweak row under the Visualizer row, covering that preset’s parameters. See Effects.
Overlay
Assigns an Overlay, such as a logo or a lower third, to show above this Clip. A Clip’s Overlay takes over from the Song’s and the Project’s.
Transitions
How the Clip arrives on stage and how it leaves. Each row carries a shape and a duration together: Fade, Wipe in four directions, or Push in four directions, plus a duration in seconds.
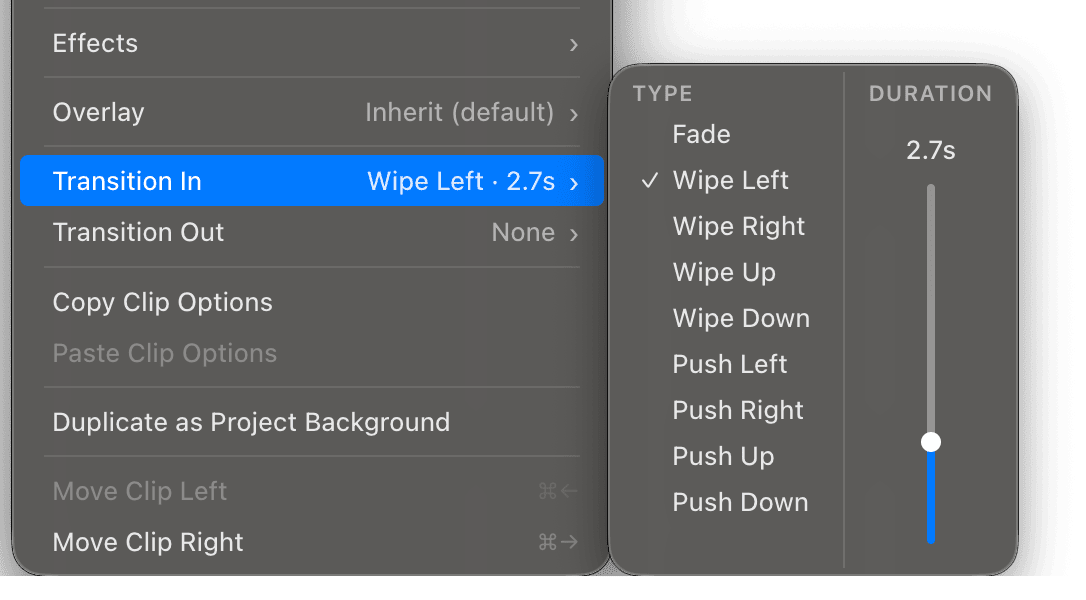
A duration of zero is a cut whatever shape is chosen, and the row reads None. Transition In also sets the crossfade from the previous Clip, and takes precedence over that Clip’s Transition Out. See Transitions.
Visualizer
Visualizer Clips only.
Choose the preset. The panel lists the available MilkDrop and ISF presets with thumbnails. Edit Visualizers… opens the Visualizers Editor. See Visualizers.
Adjusts the chosen preset’s own parameters for this Clip. It appears only for a preset that declares parameters, so a MilkDrop preset shows no row.
The rendering resolution, from 0.25x to 2x. Lower is faster; higher is sharper.
The frame rate to aim for, from 15 to 120, with snap points at 15, 30, 60 and 120.
Audio Source
What the Clip’s audio-reactive rendering listens to:
- None turns audio reactivity off.
- This Clip reacts to this Clip’s own sound and nothing else. Audio Clips only, and only once a Visualizer is paired with one. It reads the level after the Clip’s Volume, so turning the Clip down calms the picture with it, and two Audio Clips playing at once each drive their own.
- Visibox reacts to whatever Visibox is playing, Song audio and Clip audio alike.
- System Audio reacts to everything coming out of the computer.
- Any connected audio input, listed below the separator, reacts to a microphone or interface.
Visualizer Clips always have this row. An Audio Clip gets it once a Visualizer is paired with it. Any other Clip gets it once it carries an Effect, since an Effect is the other thing that can react to audio.
A new Audio Clip starts on This Clip. Everything else starts on Visibox.
Camera
Camera Clips only.
Choose the connected camera or video input this Clip shows. See Connecting Cameras & Video Inputs.
Actions
Copy captures one Clip’s settings, without its media. Paste applies them to every Clip in the current selection. This is the fast way to make a whole Song behave alike once you have one Clip right.
Deletes the selected Clips. The label counts them, so it reads Delete 3 Clips….
Copies the selected Clips. Duplicates share one media file on disk, so they cost no extra space.
Copies the Clip and makes it the Project’s Background Clip, the one that plays whenever nothing else is up.
Moves the selected Clips within the Song. Dragging them does the same thing.