Real-Time Control
Most of what Visibox does is on or off. You press a pad and a Clip plays. Real-Time Control is the other half: a knob you turn, a fader you ride, a value that moves while the Clip is on screen. Fade a logo up over eight bars. Ride a blur through the breakdown. Scrub a Clip’s playhead by hand.
It works through eight named Controls, lettered A through H. A Control is a slot, not a thing in itself. You point it at something in your Project, then you drive it from a knob on your controller, from a phone running an OSC app, or from a fader in the app itself.
What a Control Is
Every Project has Controls A through H from the start. Each one carries:
- A name, so you can call it “Blur” instead of “C”.
- A color, which shows next to the parameters it drives.
- A list of Targets it is pointed at. One Control can drive several at once.
Controls A through H are permanent. You can add more if you run out. A new one takes the letter after the highest in the list, so Visibox does not hand out a letter freed up from the middle again. That matters because a MIDI map and an OSC path both address a Control by its letter, and a reused letter would quietly drive the wrong thing.
A Control does nothing until you point it at something. An unused Control costs you nothing and changes nothing.
Targets
A Target is one parameter a Control can move. Three kinds exist.
Clip parameters, on any Clip:
| Target | What it moves |
|---|---|
| Opacity | How solid the Clip is, from invisible to full. |
| Speed | Playback rate, on video Clips. |
| Position | The playhead, on video Clips. Scrub by hand. |
| Filters | Blur, Brightness, Contrast, Grayscale, Rotate Hue, Invert, Saturate, and Sepia. |
Visualizer inputs, on an ISF (Interactive Shader Format) visualizer Clip. See Visualizers for the two Visualizer engines. Sliders, on-off switches, whole-number inputs, drop-down choices, and trigger inputs can all be driven. Two kinds cannot. Color and point inputs hold more than one number, and a Control carries one, so pointing a Control at either would move a single component and pin the rest. Image and audio inputs are the shader’s source material rather than a setting, so they are not offered.
Effect inputs, on any Effect layered onto a Clip. These are the same parameters you see in the Clip’s Tweak panel.
Targets belong to Clips, which means they belong to Songs. A Control pointed at a Clip in Song 3 does nothing while Song 1 is up.
Pointing a Control at a Target
You do this from the Clip, not from the settings window. Right-click a Clip to open its editor panel, then open the sub-panel holding the parameter you want:
- Right-click the Clip and choose Edit Clip….
- Open Speed, Position, Opacity, Filters, or Tweak, depending on what you want to drive.
- Next to the parameter is a small pop-up menu, showing a bare dash until something is assigned; its tooltip names it Assign to Control. Choose a Control from it.
- A colored dot appears beside the parameter, matching the Control you picked.
To unpoint it, choose the dash at the top of that same pop-up menu.
Select several Clips first and the assignment lands on all of them at once. If they disagree about which Control they are on, the menu shows Mixed until you pick one.
See Clip Editor Panel for the rest of what those sub-panels hold.
The Control Bus Tab
Once you have pointed a Control at something, the Control Bus tab in the Project Settings window is where you name it, test it, and shape how it responds. Choose Project > Project Settings… and pick Control Bus from the list on the left.
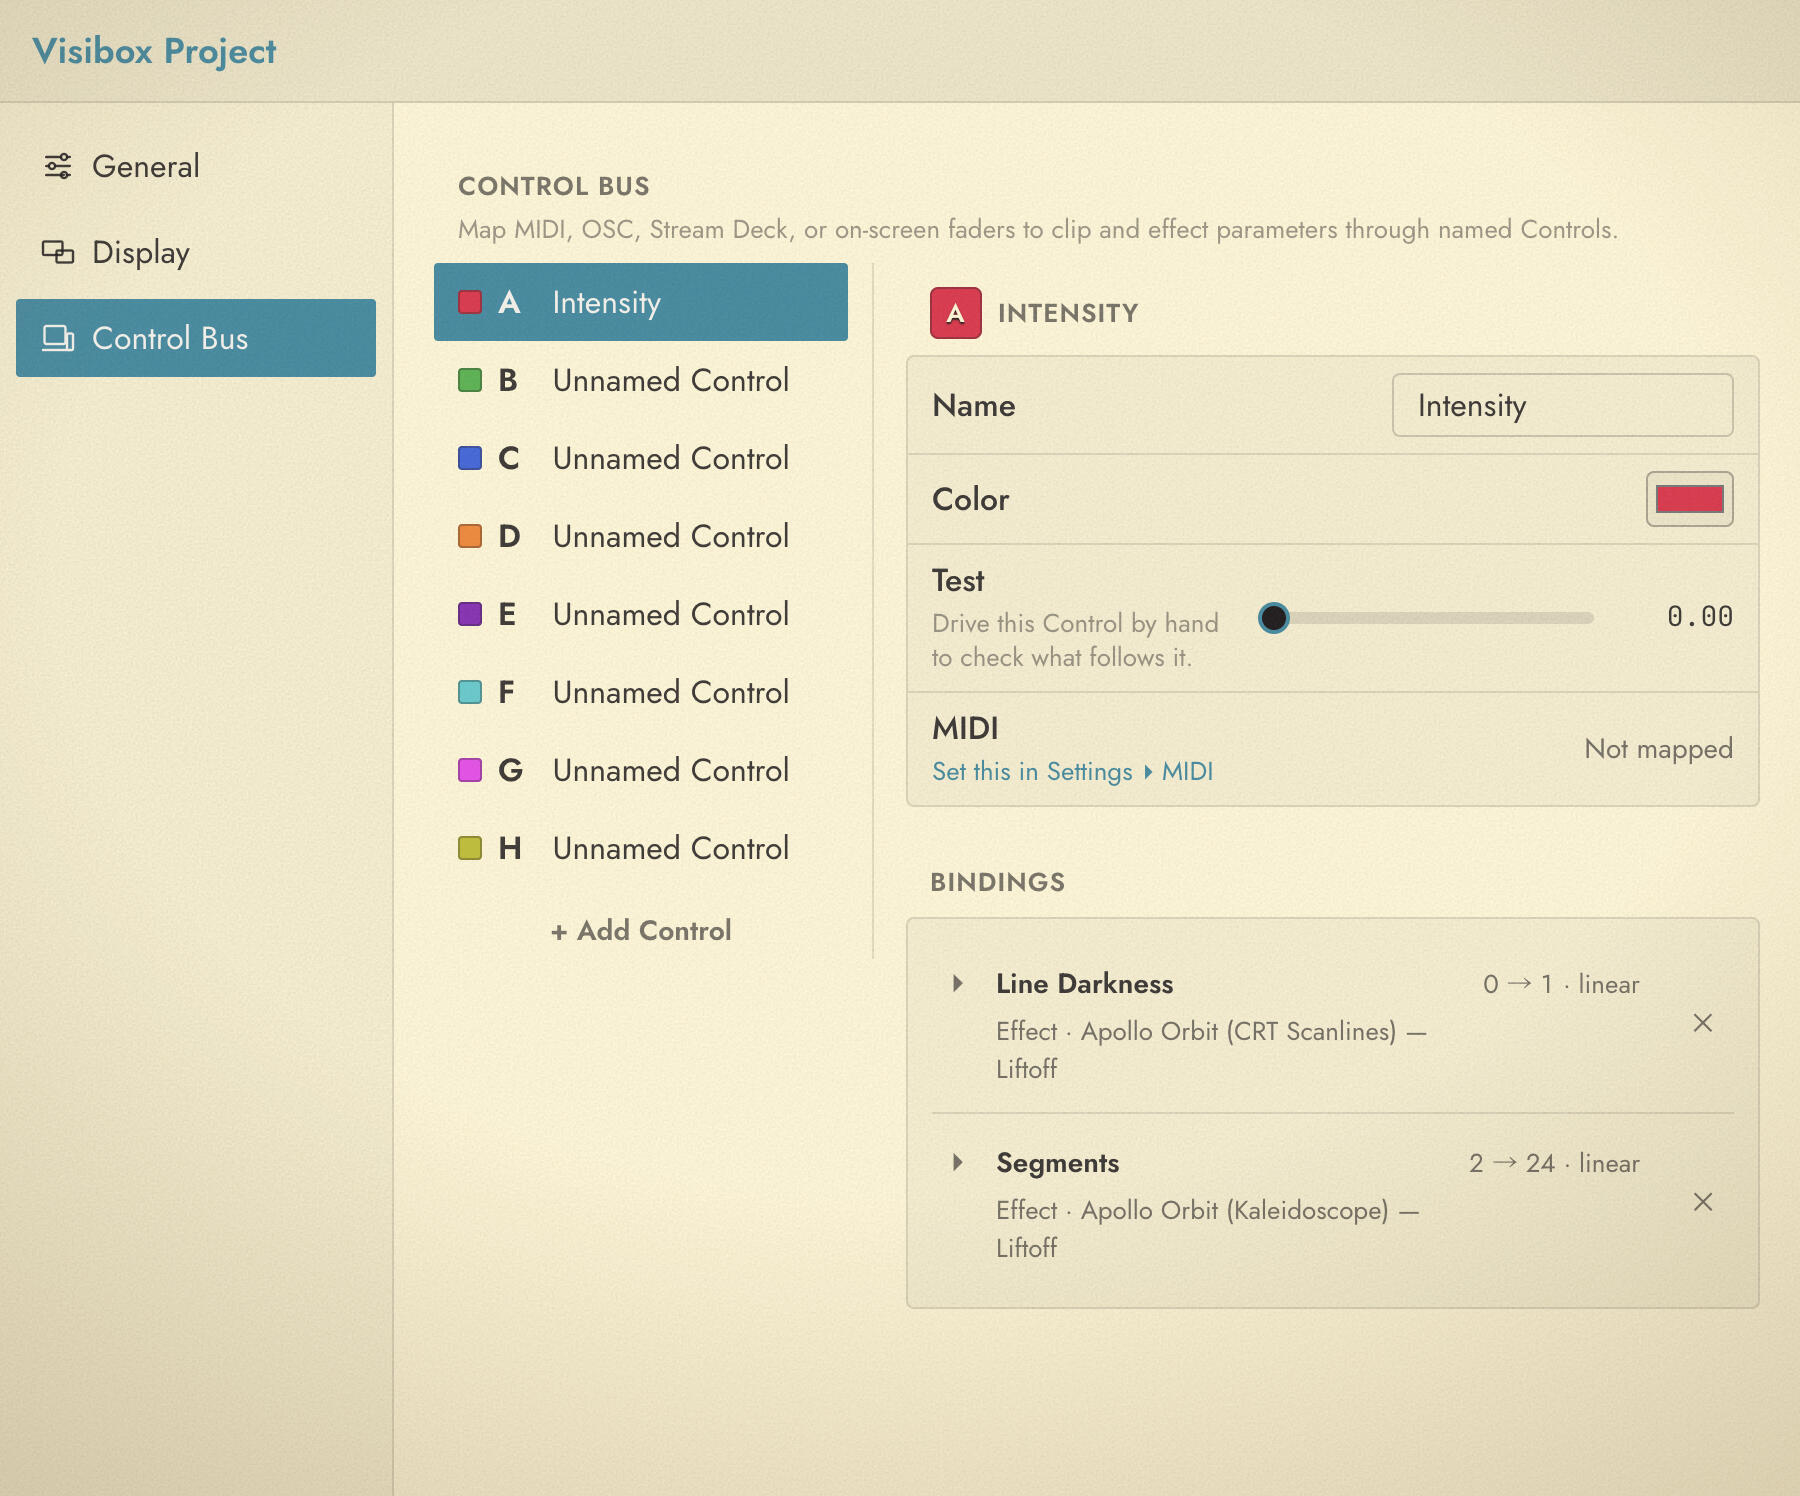
Down the left is every Control in the Project, each with its color and letter. Below the list, + Add Control adds another one. Pick a Control and its detail appears on the right:
| Row | What it is |
|---|---|
| Name | What you call this Control. Leave it blank and it stays the bare letter. |
| Color | The color shown beside every parameter this Control drives. |
| Test | A fader you can drag to drive the Control by hand and watch what follows it. |
| MIDI | What is mapped to this Control, or Not mapped. Click through to set it up. |
| Bindings | Every Target this Control is pointed at, grouped by the Clip and Song it is in. |
The Test fader is live, and it moves on its own when a hardware knob drives the same Control. It is the fastest way to check a patch before a show without touching the controller.
Removing a binding here unpoints that one Target and leaves the rest alone. Controls A through H cannot be removed, but any Control you added yourself can be.
Driving a Control
From a MIDI controller
A knob or fader that sends Control Change messages is the usual way in. In the MIDI Map there is a row per Control, reading Control A, Control B, and so on. Arm the row, move the knob, and it is mapped. See Using MIDI for the step-by-step.
A CC runs 0 to 127, and Visibox spreads that across the Control’s full travel. Notes and buttons are not offered here: a Control wants something continuous.
The MIDI map belongs to your rig rather than to a Project, so the same knob drives Control A in every Project you open.
From OSC
Send a float to /visibox/control/A, replacing the letter as needed. Addressing by letter rather than by name means a phone layout you built last year still works against a Project you made this morning. See OSC.
You can also write a Target directly, skipping Controls altogether, with /visibox/param/. That is on the OSC page too.
From a Stream Deck
The plugin’s Control action sets or nudges a Control from a button, and sweeps it from a dial. See Stream Deck.
From the command line and AI tools
visibox control A 0.5 sets a Control from a shell or a script, and the API’s MCP tools give an AI assistant the same reach. See Command Line and the Visibox API.
From the app
The Test fader on the Control Bus tab. Useful for setup and for a show where you are already at the keyboard.
Shaping the Response
A raw knob is rarely what you want on stage. Each binding, not each Control, carries its own conditioning, so the same Control can move one Target across its whole range and nudge another gently.
Click a binding to open it. You get min and max, and a curve:
| Curve | What it does |
|---|---|
linear | Straight through. The knob and the parameter move together. |
exp | Slow at the bottom, fast at the top. Good for opacity and volume. |
log | Fast at the bottom, slow at the top. Good for a blur you want to feel early. |
s | Gentle at both ends, quick through the middle. |
Set min higher than max and the Control runs backwards, which saves rewiring a fader you have mounted upside down.
Behind the Conditioning options button are four more:
| Option | What it does |
|---|---|
| deadzone | Ignores the bottom of the knob’s travel and spreads the rest across the full range. Kills the drift on a cheap fader that never quite reaches zero. |
| smoothing | Eases the value over a number of milliseconds instead of jumping. Takes the stepping out of a coarse controller. |
| steps | Quantizes the value into a fixed number of stops. Two steps makes a switch out of a fader. |
| takeover | Decides what happens the moment a knob starts sending again. See below. |
Takeover
A knob has a physical position. The parameter has a current value. When you switch Songs or reload a Project, those two disagree, and the first touch of the knob can throw the parameter somewhere you did not want.
| Takeover | What happens on the first message |
|---|---|
| None | The Target jumps straight to wherever the knob is. |
| Pickup | Nothing happens until the knob passes through the Target’s current value, then it takes over. |
| Scale | It takes effect at once, with the knob’s remaining travel rescaled so its current position maps to the Target’s current value. |
Pickup is the safe one for a show, and the reason most desks offer it. Scale is the one for a soft controller with a motorless fader you want responding immediately. None is fine while you are building a Project.
Tips
Name your Controls before the second gig, not after. “Blur” and “Logo Fade” are readable in a dark room. “C” and “F” are not.
A Control set up in one Project does not carry into another, because it is pointed at that Project’s Clips. What does carry is the MIDI mapping: the same knob lands on Control A wherever you open it, ready for whatever that Project has pointed A at.
See Also
- Using MIDI for mapping a knob to a Control.
- OSC for driving Controls from a phone, a tablet, or a cue system.
- Clip Editor Panel for the sub-panels where bindings are made.
- Effects for the Effect inputs a Control can drive.