Media Management & Optimization
Visibox plays most media as it comes, but files often arrive heavier than the show needs: a poster-sized image, a video with a cinema bitrate, a 96 kHz audio file playing through a 48 kHz system. Optimizing re-encodes those files so they load faster and play back smoothly, and it repairs bad encodes that would otherwise pause or glitch. The Media Overlay is where you see which files are worth the trouble, and fix them in place.
The Media Overlay
Choose Project > Manage Media… to open the Media Overlay. It lists every media file in the current Project.
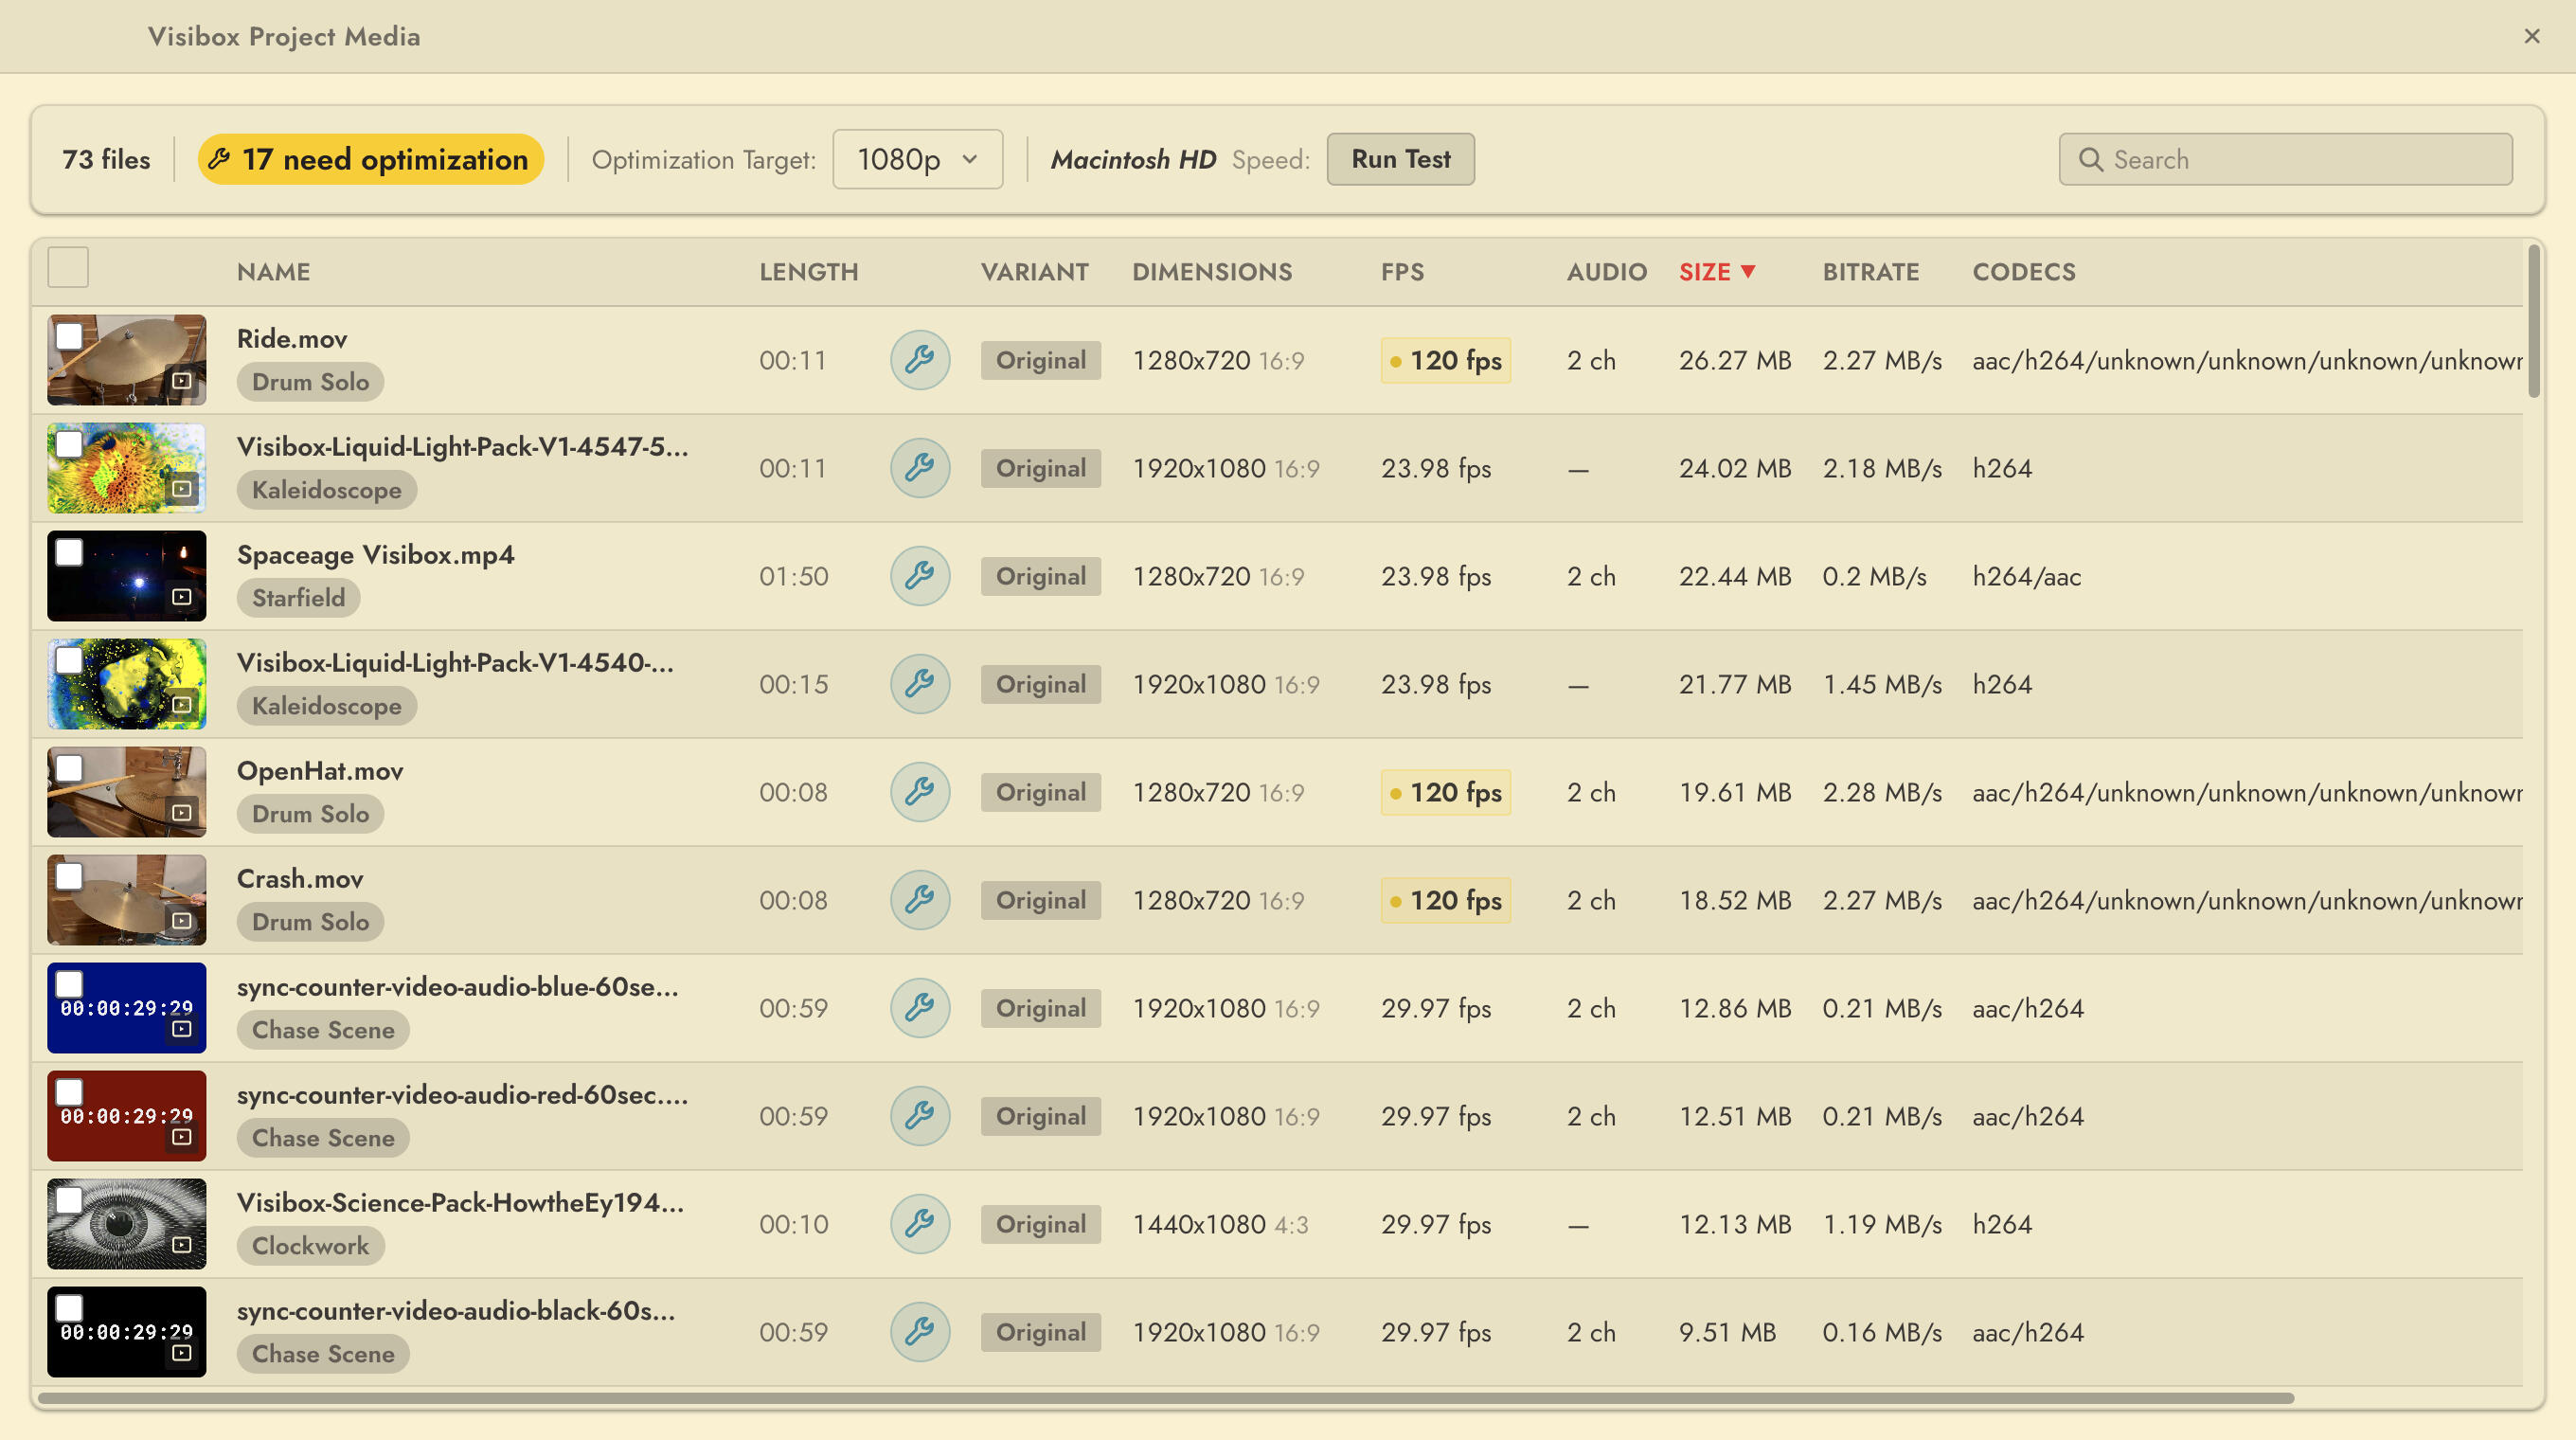
The Media Overlay lists, renames and optimizes your media files. It is also where a video or image gets a custom thumbnail.
To close it, click the close button in the upper right corner or press Escape.
The Information Bar

The Information Bar
The bar across the top sums up the Project’s media, and most of its values do something when clicked. Hover over a value for the detail.
| Item | What it shows and does |
|---|---|
| File count | How many media files the Project holds. |
| Selected | How many files are selected, shown only while something is. Its tool button optimizes the selected files. |
| x need optimization | How many files are out of range. Its tool button optimizes them all; clicking the text itself filters the list down to them. |
| Optimization Target | The size and format files are converted to when you optimize. Click it to choose 720p, 1080p, 4K, or 8K. The default is 1080p. A file that exceeds the target’s dimensions, frame rate, or bitrate counts as needing optimization. |
| Drive speed | How fast the drive holding the Project reads, which is what decides whether big files load in time. Click Run Test to measure it, and click the result to run the test again. |
| Search | Filters the list. It matches any part of a name, a type, and most other metadata, ignoring case. Click the “x” to clear it. |
If the test reports a slow drive, move the Project to a faster one or optimize the media so it asks less of the drive it is on.
The columns

The Media Table Header
Click any column header to sort by it.
| Column | What it holds |
|---|---|
| Media Type | The thumbnail or waveform, icons naming the type, the selection checkbox, and (for images and videos) the custom thumbnail button. The checkbox in the header selects or deselects every visible file. |
| Name/Songs | The file’s name and the Songs that use it. Click the name to rename the file. |
| Duration | The length of a video or audio file. An image reads ∞. |
| Optimization | The file’s optimization status. Sorting here groups optimized and unoptimized files together. |
| Variant | The variant files that exist for this media. An optimized file shows both the original and the optimized copy. |
| Dimensions | Width by height in pixels, and the aspect ratio. |
| FPS | A video’s frame rate. |
| Size | The file size in megabytes. An optimized file shows the original size too. |
| Bitrate | The file’s bitrate in MB/s. |
| Codecs | The video and audio codecs in the file. For an image, the file format. |
Working in the list
The Media Table Body
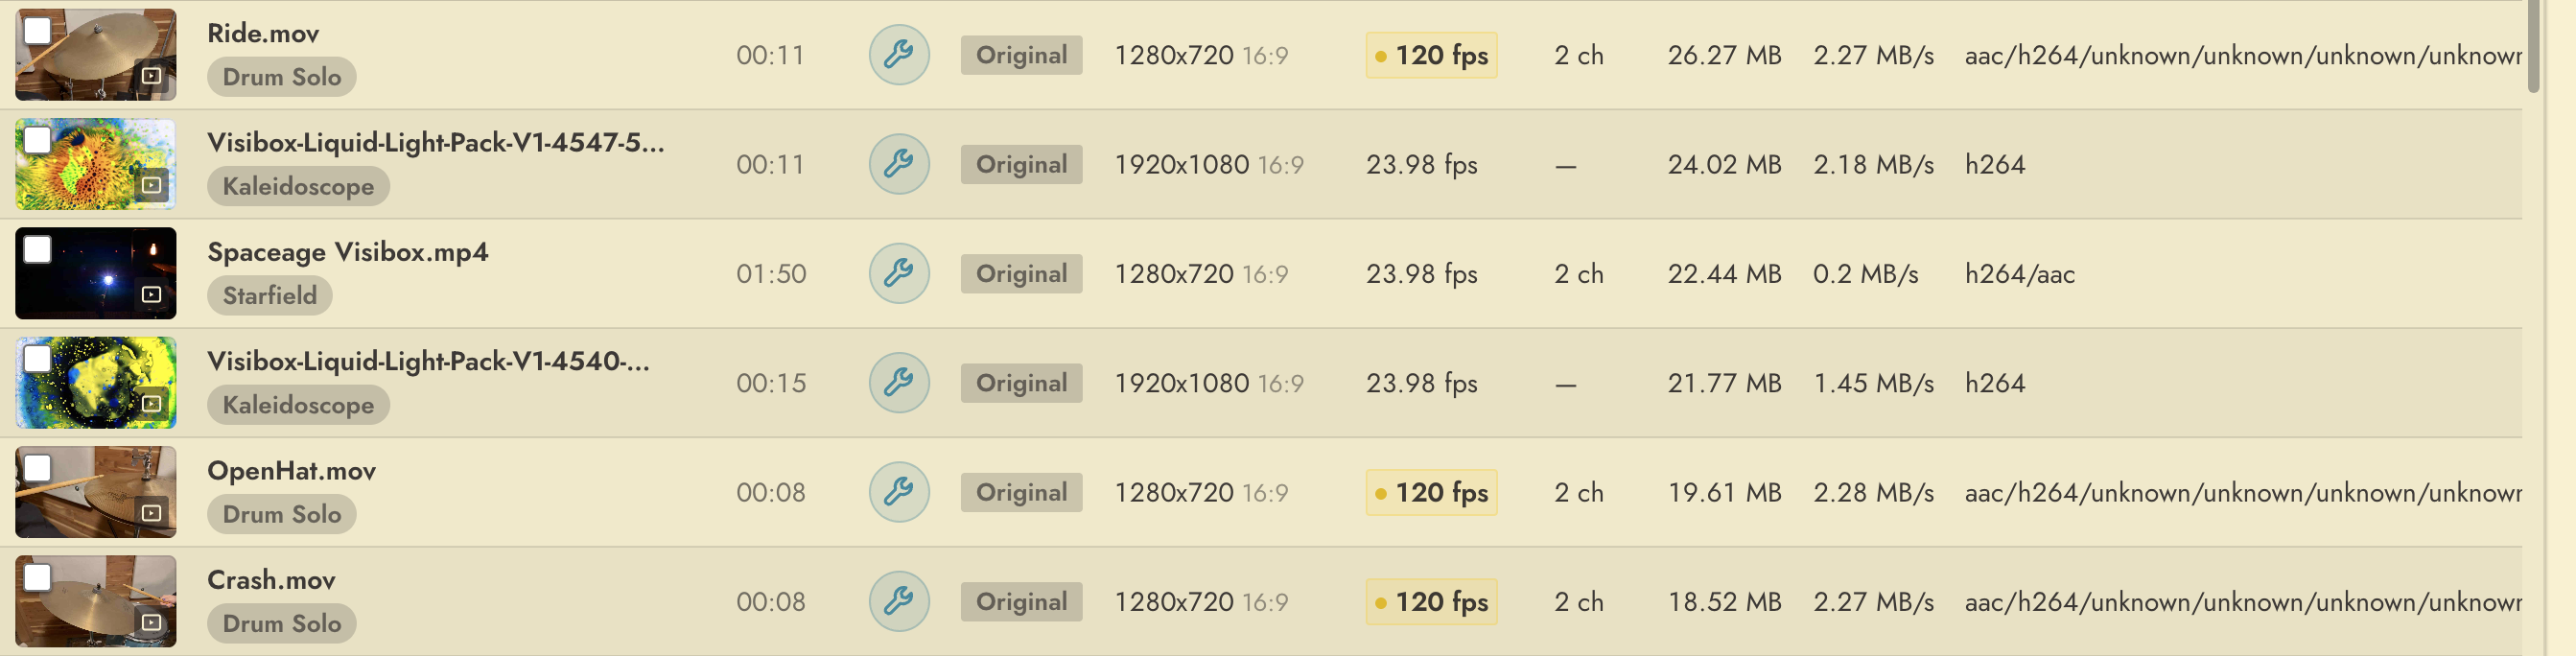
Each row is one media file. Hover over anything in a row for a tooltip.
Selecting. Click a file’s checkbox or its thumbnail to select it, and shift-click to select a range. Selected files show a blue outline, and the Information Bar offers to optimize them as a group.
Renaming. Double-click a file’s name, or click its edit button, then press Enter to save or Escape to cancel.
Optimizing. A file that needs optimization has a live tool button in its Optimization column; click it to convert the file to the Optimization Target. Hold Shift while clicking to optimize every unoptimized file at once. Values that exceed the target are highlighted in yellow so the files worth attention stand out in a long list, and clicking a highlighted value optimizes that file directly.
After optimizing. The row splits to show the original and the optimized copy side by side, sizes and all, with the unused original in a lighter color. The tool button becomes a revert button that puts the original back. Nothing is thrown away.
Custom thumbnails. A video or image can carry a thumbnail of your choosing: click the button in the Media Type column and pick an image, or drag an image straight onto the existing thumbnail. The same button then removes it. Custom thumbnails earn their keep in a Project full of similar-looking files, and in a Stream Deck kiosk where visitors pick media by picture.
HEVC proxies
HEVC (H.265) video plays as it comes on almost every machine. Where Windows cannot decode it in hardware, Visibox plays an H.264 copy instead. The copy is a proxy: your original stays in the Project untouched, and the proxy sits in the list above like any other optimized copy, revert button included.
Opening a Project that holds HEVC video on such a machine brings up Optimize HEVC videos for playback?, offering 720p, 1080p and 4K. The size you pick becomes the Project’s Optimization Target, and every HEVC file in the Project is queued. Cancel queues nothing, and those Clips will not play until you optimize them by hand from the list above. Files you add afterwards are converted without asking.
Conversion runs in the background and waits while anything is playing on the Output, so an encode never competes with a show. A Clip whose proxy is not ready does nothing when triggered, and plays as soon as the proxy lands.
Keeping the indexer out of your media
A Project folder is a hard place for a file indexer to sit. Every save rewrites the Project file, every import copies gigabytes of video in, thumbnails are written continuously, and a fresh backup lands every few minutes. Each of those sends the indexer back over the folder, and that disk work competes with playback on the machine running your show.
On macOS, Visibox marks a Project’s media folder and its Backups folder to be skipped by Spotlight. This happens on its own when you open a Project. There is nothing to switch on.
The Project file itself is deliberately left indexed, so your Project still turns up in a Spotlight search by name. Only the bulk media and backups inside it are skipped.
If the folders sit on a read-only volume, or permissions get in the way, Visibox carries on without the exclusion rather than failing to open the Project.