Effects
Effects are real-time visual treatments applied to a Clip. They add motion, texture, distortion, color shifts, and audio-reactive behavior without touching your original media files. A Clip can carry several at once, and every Effect can be dialed in for that one Clip.
Two kinds of Effect
Visibox runs two kinds of Effect side by side, and you use them the same way.
| Kind | What it is |
|---|---|
| CSS effect | Built from CSS and optional SVG filters. Good for motion, color grading, blurs, retro looks, and anything that treats the whole frame. |
| ISF effect | A GLSL fragment shader in Interactive Shader Format. Good for warps, feedback, and per-pixel math. |
The difference that matters in practice is where each one sits. An ISF effect runs on the Clip’s source media. CSS effects wrap what comes out of that. So an ISF warp followed by a CSS color grade grades the warped image, not the original.
Applying Effects to a Clip
Right-click a Clip and open the Effects row, or choose Clip > Edit Clip…. The row names everything currently on the Clip, and its panel is the Clip’s effect stack.
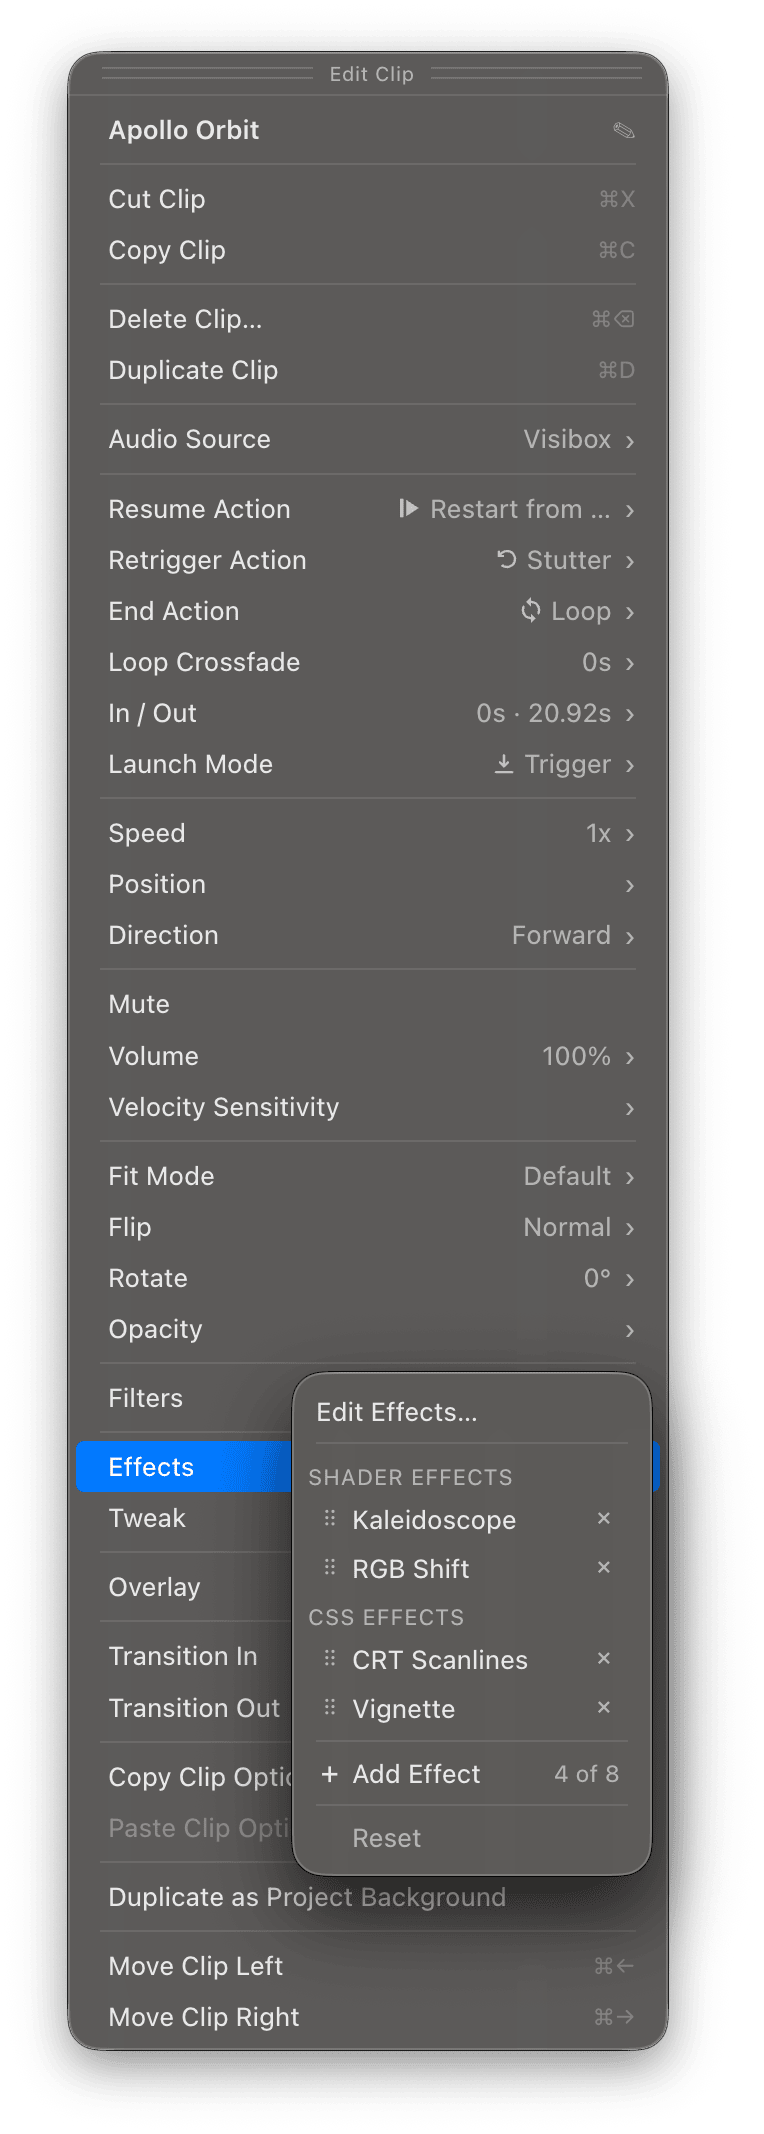
Click Add Effect and a picker opens. Type in Search effects… to narrow the list, then click an Effect and it applies immediately. If the Clip is playing you see it in the Output right away. An Effect already on the Clip is left out of the picker, since each one goes on a Clip once.
The effect stack
The panel lists the Effects on the Clip in the order they run, top to bottom. A counter beside Add Effect reads 3 of 8, or whatever the count is: a Clip carries up to eight Effects. At eight the panel reads Effect limit reached and Add Effect does nothing until you take one off.
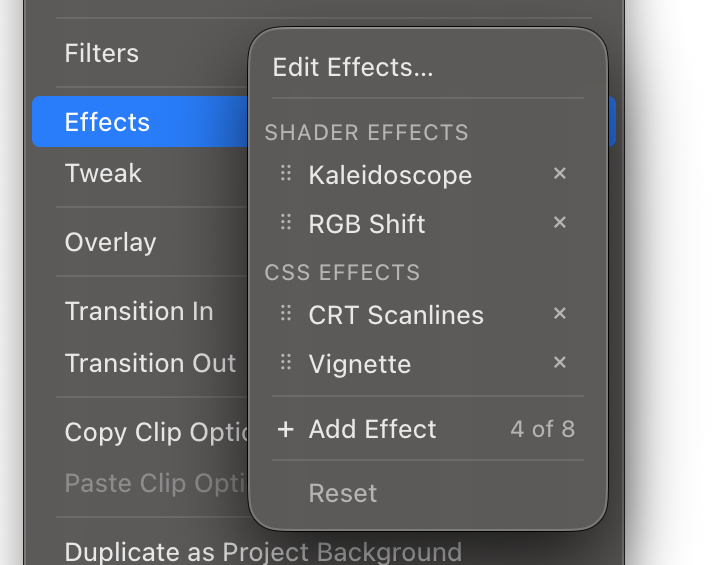
- Drag to reorder. Once two or more Effects of the same kind are on the Clip, a grip appears at the left of each row. Drag a row up or down to change where it sits in the stack.
- Remove one with the × at the right of its row. Reset at the bottom clears the lot.
- Edit Effects… at the top opens the Effects editor.
When a Clip holds both kinds, the panel groups them under Shader effects and CSS effects. The groups are the render order: an ISF effect runs on the source media and CSS effects wrap what comes out, so a shader is always inside a CSS effect. You can reorder within a group, but not drag a row across the boundary.
Tweak
Under the Effects row is a Tweak row. It holds the parameters that the Clip’s Effects expose: a speed, an amount, a color, whatever the preset’s author declared.
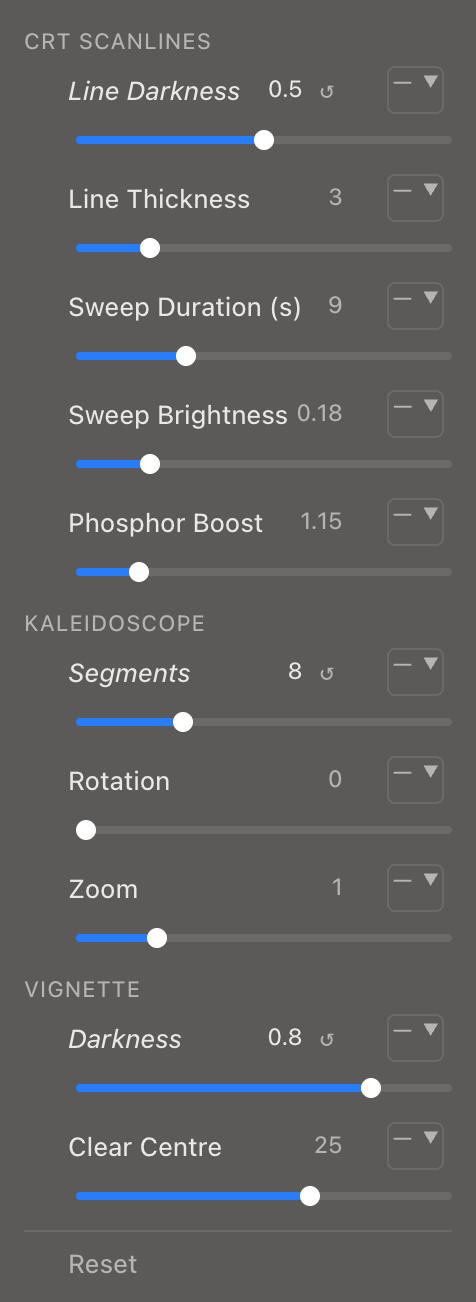
Tweak changes apply to this Clip only. Two Clips using the same Effect can hold completely different values, and editing the preset later still reaches every parameter neither of them overrode. The row shows a count of how many parameters this Clip has changed.
The Tweak row appears only when the Clip’s Effects actually declare parameters. An Effect with nothing to adjust shows no row rather than an empty panel.
To change the values everything starts from, edit the Effect’s Preset Defaults in the Effects editor instead. Those apply to every Clip that has not set its own.
Audio Source
Audio-reactive Effects respond to an audio signal, and you choose which one per Clip.
The Audio Source row is always there for a Visualizer Clip, since a Visualizer is audio-reactive from top to bottom. An Audio Clip gets it once a Visualizer is paired with it. On a video, image, or camera Clip the row appears once the Clip has an Effect on it. An Effect is the only other thing on those Clips that can read the audio.
Right-click the Clip and open the Audio Source row:
| Option | What it listens to |
|---|---|
| None | Nothing. The Effect still runs but stops moving with the music. |
| This Clip | This Clip’s own sound and nothing else. Audio Clips only. |
| Visibox | The audio playing inside Visibox: Clip audio, Song audio, and the master mix. This is the default. |
| System Audio | Audio from other applications on the computer, such as a streaming service, a DAW, or a browser. |
| an input device | A microphone, a line input, or an audio interface. Your available inputs are listed by name below the options above. |
System Audio is listed only once System Audio Input is switched on in Settings > Audio. On macOS 14.2 and later, the first time you enable it macOS asks for permission to capture system audio.
The Effects editor
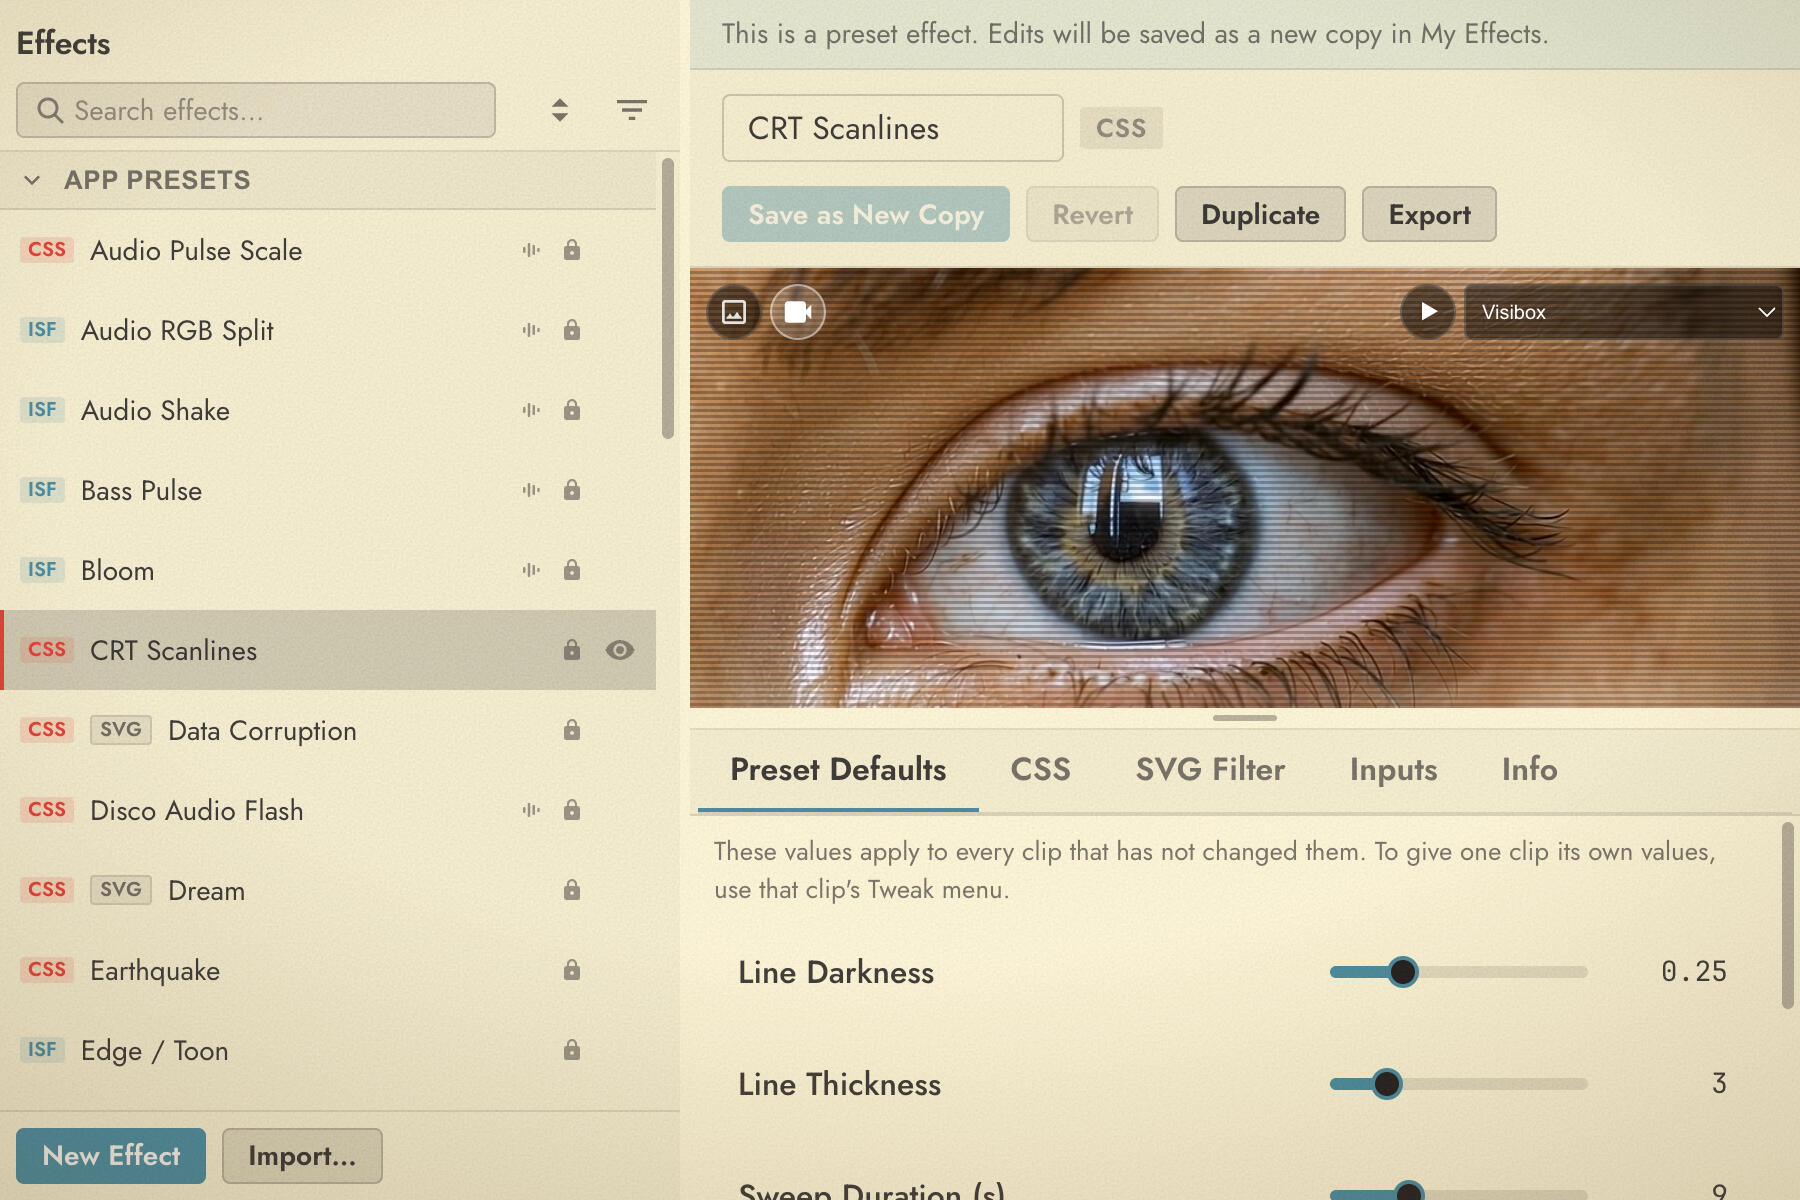
The Effects editor is a tab in the Editor Window. Open it from Effects… in the Visibox menu on Mac or the File menu on Windows.
Where Effects come from
The list is grouped into four sections:
| Section | What is in it |
|---|---|
| App Presets | The Effects that ship with Visibox. Read-only. |
| Plugins | Effects loaded from your Plugins folder at startup. Read-only. |
| My Effects | Effects you created or imported. Fully editable, stored on your machine. |
| Project Effects | The copies stored inside the Project you have open. These are what actually run. |
Linked and unlinked
Applying an App Preset, a Plugin, or one of My Effects to a Clip puts a linked copy in the Project. A linked copy:
- Stays in sync. Edit the original in My Effects. Every Project holding a linked copy of it picks up the change the next time you open it, as long as the original is still on the same computer.
- Cannot be edited in place. Edits are saved as a new copy instead.
Editing a linked Effect never touches the original: the editor says so, the Save button reads Save as New Copy, and saving puts an independent, editable copy in My Effects. Right-clicking the Effect under Project Effects and choosing Duplicate to My Effects does the same thing without opening the editor. Either way, later changes to the original leave the copy alone.
Projects are self-contained
Every Project stores a complete copy of its Effects, linked ones included:
- Deleting one of My Effects will not break a Project. The Project falls back to its own copy and plays exactly as before. Visibox notes that the original source is gone, but the visuals do not change.
- Projects travel with their Effects. Your
.vsbxProject carries everything it needs to play back on another machine.
Browsing
- Search by name in the box at the top.
- Kind badges on every Effect in the list mark it as CSS or ISF.
- Filter to CSS or ISF effects, by section, or by visibility.
- Sort alphabetically or by section.
- Hide Effects you never use with the visibility toggle that appears on hover.
Changes to the list can be taken back while the editor tab is showing. Press ⌘Z or use Edit > Undo, and the Edit menu names the step: Undo Hide Effect, Undo Show Effect, Undo Remove Effect and so on.
Apply to Selected Clips
Select one or more Clips in the Controller, then right-click an Effect in the editor. The first row of the menu applies it to everything you selected, and names the count: Apply to 3 Selected Clips. Faster than working through them one at a time.
Audio audition
To hear how an Effect behaves, hover its preview and click the play button that appears. Visibox plays a test signal so you can watch the audio-reactive behavior while you design, with no Project needed.
The editor tabs
| Tab | What it is |
|---|---|
| Preset Defaults | The values every Clip starts from. A Clip’s own Tweak values override these. |
| CSS | The stylesheet, for a CSS effect. Use .effect-target as the selector and effect-anim as the keyframe name. |
| SVG filter | An optional SVG filter for a CSS effect: blur, displacement, channel manipulation. |
| ISF Shader | The GLSL fragment shader, for an ISF effect. The Clip’s source media arrives as the inputImage input. |
| Vertex | An optional vertex shader for an ISF effect. Leave it blank for the default pass-through. |
| Inputs | The parameters this Effect exposes. Declare them here and they show up in Preset Defaults and in Tweak. |
| Passes | Multi-pass rendering, for an ISF effect. Each pass can write to a buffer that a later pass reads. |
| Info | Name, description, credits, and categories. |
CSS effects show the CSS and SVG filter tabs. ISF effects show ISF Shader, Vertex, and Passes.
Creating an Effect
- Click New in the Effects editor to add an Effect to My Effects.
- Double-click the title to name it.
- Write the effect in its code tab.
- Add anything you want adjustable to the Inputs tab, then set sensible starting values in Preset Defaults.
Editing an App Preset or a Plugin is allowed, but saving writes a new copy into My Effects rather than overwriting the original. The editor tells you so before you save.
Audio-reactive CSS properties
Visibox updates a set of CSS custom properties in real time from the Clip’s chosen Audio Source. Use them anywhere in your stylesheet.
Frequency bands (0.0 to 1.0, smoothed):
| Property | Range |
|---|---|
--audio-bass | 20–250 Hz |
--audio-low-mid | 250 Hz – 1 kHz |
--audio-mid | 1–4 kHz |
--audio-high-mid | 4–8 kHz |
--audio-treble | 8–20 kHz |
Peak values (0.0 to 1.0, fast attack, slow decay):
| Property | Range |
|---|---|
--audio-bass-peak | 20–250 Hz peak |
--audio-low-mid-peak | 250 Hz – 1 kHz peak |
--audio-mid-peak | 1–4 kHz peak |
--audio-high-mid-peak | 4–8 kHz peak |
--audio-treble-peak | 8–20 kHz peak |
Level meters (0.0 to 1.0):
| Property | Description |
|---|---|
--audio-level | Overall RMS level (mono) |
--audio-level-l | Left channel RMS level |
--audio-level-r | Right channel RMS level |
--audio-peak | Overall peak level |
Use them like any custom property:
.effect-target {
  transform: scale(calc(1 + var(--audio-bass-peak) * 0.15));
  filter: brightness(calc(1 + var(--audio-peak) * 0.5));
}
ISF shaders read audio through the format’s own audio and audioFFT input types: the raw waveform and the frequency spectrum. See the ISF documentation.
Audio-reactive Effects read best on music with clear dynamics: a strong beat, a defined bass line, or sharp transients. They also stand out more on darker footage, where the glow and pulse have somewhere to go.
Importing and exporting
Effects are shared as .vbfx files. To import one, drop it into the Effects editor and it lands in My Effects.
To send one the other way, right-click it and choose Export to Plugins Folder. To install a file someone sent you, put it in your Plugins folder:
- Mac:
~/Library/Visibox/Plugins/ - Windows:
%APPDATA%\Visibox Plugins\Plugins\
Plugins load at startup and appear in the Plugins section of the list.
Visibox 6.0 moved the Windows folder. It used to be %LOCALAPPDATA%\Visibox\Plugins\, which sat inside the install and was wiped when Visibox was uninstalled, taking your plugins with it. Visibox moves what is there the first time 6.0 starts, so you have nothing to do.